Microsoft Entra ID identity provider integration
You can integrate your Microsoft Entra ID identity provider (IdP) with Axiad Mesh to ensure that your users are securely signing in to the portal.
The integration requires updates on both Entra ID and Axiad Mesh.
Entra ID configuration steps
These steps are Axiad's current understanding of the configuration. Because Entra ID is a third-party product, there may be slight variations between your experience and what this guide describes. We work hard to keep things as up to date as possible, but depending on the versions in use, the latest updates, and so on, there may be some mismatches.
If you find any significant differences or anything that doesn't make sense, contact Axiad support so we can update this guide.
The Entra ID steps are similar for both integrations with Axiad Mesh — as an IdP and as a connector. However, it's important that each integration type has its own enterprise application in Entra ID to ensure that the permissions are assigned accordingly.
Create a new enterprise application
-
Sign in to the Microsoft Entra admin center as at least a Cloud Application Administrator.
-
Navigate to Identity > Enterprise applications.
-
Select New application.
-
On the Browse Microsoft Entra Gallery page, select Create your own application.
-
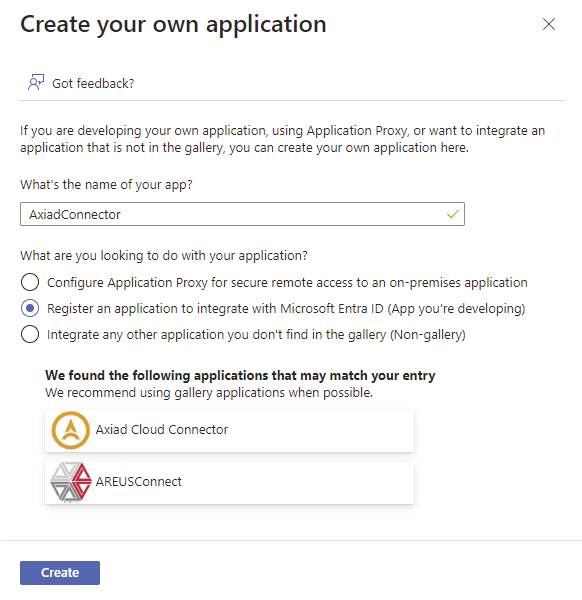
In the Create your own application pane, set the Name to a friendly name.
-
Select Register an application to integrate with Microsoft Entra ID (App you're developing).
-
Select Create.
-
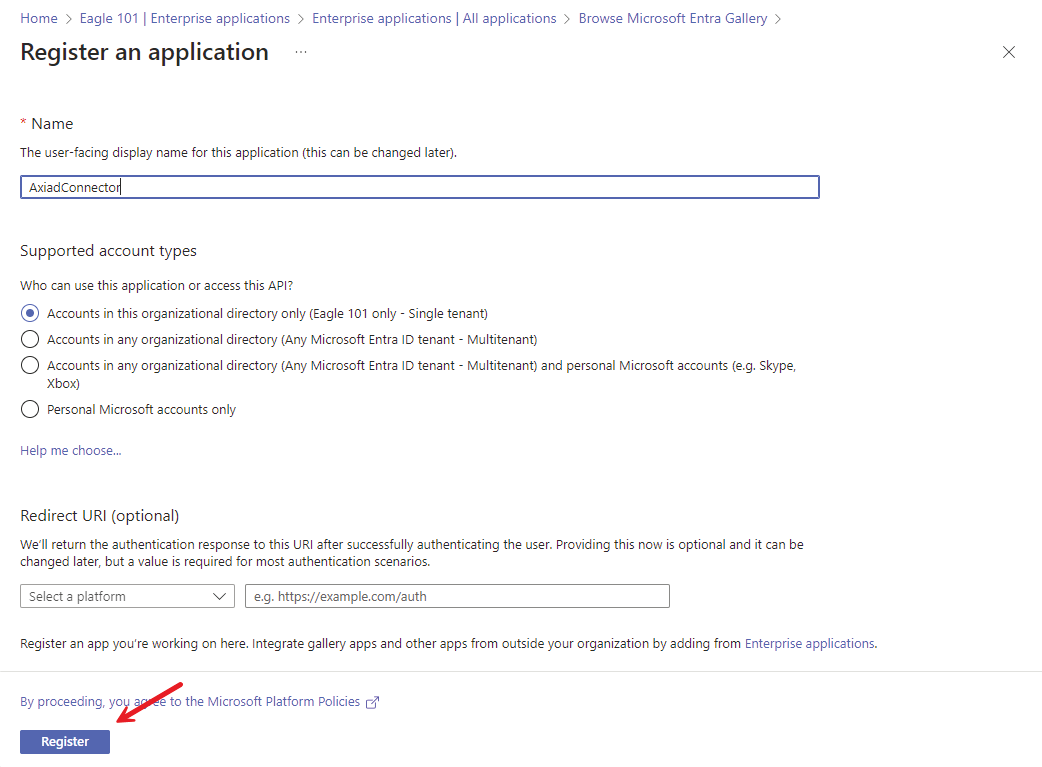
On the Register an application page, set the Name to the friendly name.
-
Select Accounts in this organizational directory only (Single tenant). The option label includes your directory name, for example Eagle 101 only - Single tenant.
Axiad recommendationWe recommend that you create and test the integration with Axiad Mesh using a single tenant. Upon success, you can then change this setting to a multitenant environment as needed.
-
Select Register.
Configure application properties
-
In the Entra admin center, navigate to Identity > Enterprise applications > All applications.
-
Locate and open your newly created application.
-
Under Manage in the menu, select Properties.
-
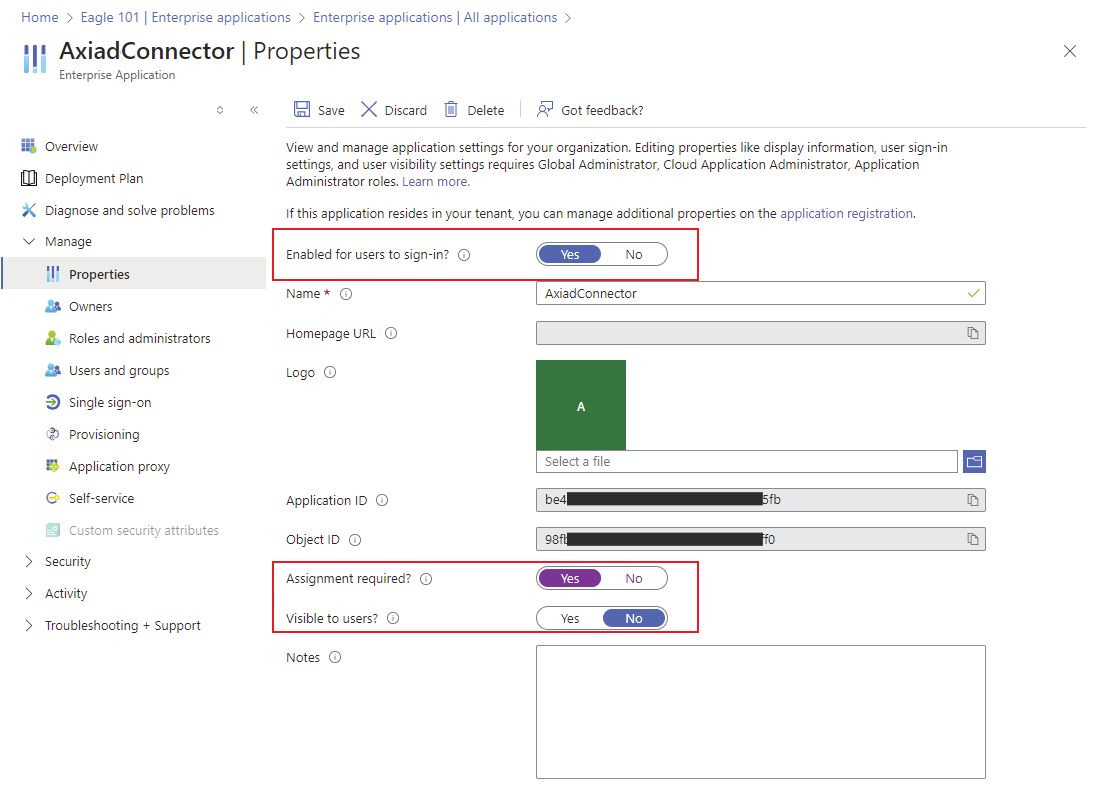
Select Yes for Enabled for users to sign-in?.
-
Select Yes for Assignment required?.
-
Select No for Visible to users?.
-
Select Save.
-
Copy the Application ID — you need it for the Axiad Mesh configuration steps.
Add the redirect URI
Your Axiad Mesh sign-in URL includes a domain query parameter that identifies
which identity provider to use. Entra ID matches redirect URIs as exact strings,
so a redirect URI registered without that query parameter does not match,
and sign-in fails.
-
In the Entra admin center, navigate to Identity > Applications > App registrations and open your newly created application.
-
Under Manage in the menu, select Authentication.
-
Select Add a platform, and then select Web.
-
Set the Redirect URI to your Mesh portal URL followed by
/oauth2/callback?domain=, plus the domain you enter in the Mesh configuration steps:https://YOUR-SUBDOMAIN.mesh.axiad.io/oauth2/callback?domain=YOUR-DOMAINFor example, if your portal is
https://contoso.mesh.axiad.ioand the Domain you configure in Mesh iscontoso.com, register:https://contoso.mesh.axiad.io/oauth2/callback?domain=contoso.com -
Select Configure.
https://contoso.mesh.axiad.io/oauth2/callback on its own is not a match.
The ?domain= value must be character-for-character identical to the Domain
value you enter in the Axiad Mesh configuration steps.
If the Redirect URIs field rejects the query string, add it through the
application manifest instead: Manage > Manifest, then add the full URI to
replyUrlsWithType with "type": "Web".
An unregistered redirect URI does not always surface as AADSTS50011. When
silent authentication is in use, Entra ID evaluates the sign-in session before
it validates the redirect URI, so the same misconfiguration can appear as
AADSTS50058. Interactively, the sign-in form is rendered first, so a user only
sees AADSTS50011 after entering their password. Verify the registered value
rather than reading the error code.
Configure the groups claim
Axiad Mesh decides who is an administrator from the group membership Entra ID reports at sign-in. By default, Entra ID does not report group membership at all, and the result is easy to miss: sign-in still succeeds, but nobody is granted the Mesh admin role.
- In the Entra admin center, navigate to Identity > Applications > App registrations and open your newly created application.
- Under Manage in the menu, select Token configuration.
- Select + Add groups claim.
- Select Security groups.
- Expand ID, Access, and SAML, and set Customize token properties by type to Group ID for each.
- Select Add.
To confirm the result, open Manage > Manifest. A correctly configured application contains:
"groupMembershipClaims": "SecurityGroup",
"optionalClaims": {
  "idToken": [{ "name": "groups" }],
  "accessToken": [{ "name": "groups" }]
}
Selecting Group ID makes Entra ID report each group as its object ID (a GUID). Axiad Mesh matches your nominated admin groups against those values exactly — it does not look up display names. If you choose a name-based option here, or enter display names in the Admin groups field later, nobody is granted the admin role.
Configure application owners
- In the Entra admin center, navigate to Identity > Applications > Enterprise applications > All applications.
- Locate and open your newly created application.
- Under Manage in the menu, select Owners.
- In the Owners pane, search for and add the desired application owners.
- After they're all added, select Save.
Assign users and groups
-
In the Entra admin center, navigate to Identity > Applications > Enterprise applications > All applications.
-
Locate and open your newly created application.
-
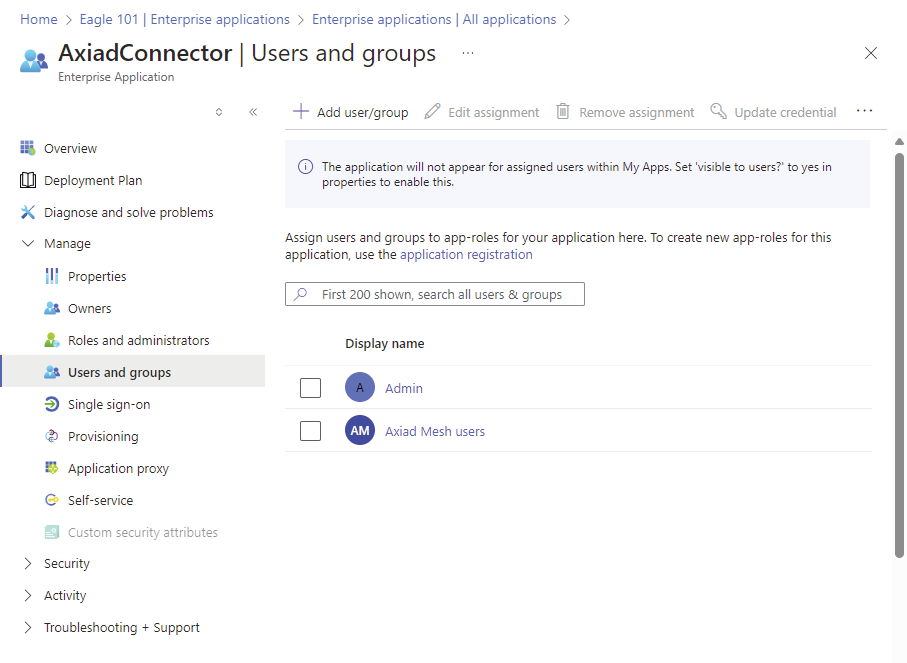
Under Manage in the menu, select Users and groups.
-
Search for and select the application users and groups allowed to use Axiad Mesh.
-
After the users and groups are added, select Save.
-
Copy the Object ID of each group that should receive the Axiad Mesh admin role — you need these values for the Admin groups field in the Axiad Mesh configuration steps. To find a group's object ID, navigate to Identity > Groups > All groups, open the group, and copy the Object Id value from its Overview page.
Generate a client secret
-
In the Entra admin center, navigate to Identity > Applications > Enterprise applications > All applications.
-
Locate and open your newly created application.
-
Under Manage in the menu, select Single sign-on.
-
On the OIDC-based Sign-on page, select Go to application in the Configure application properties section.
-
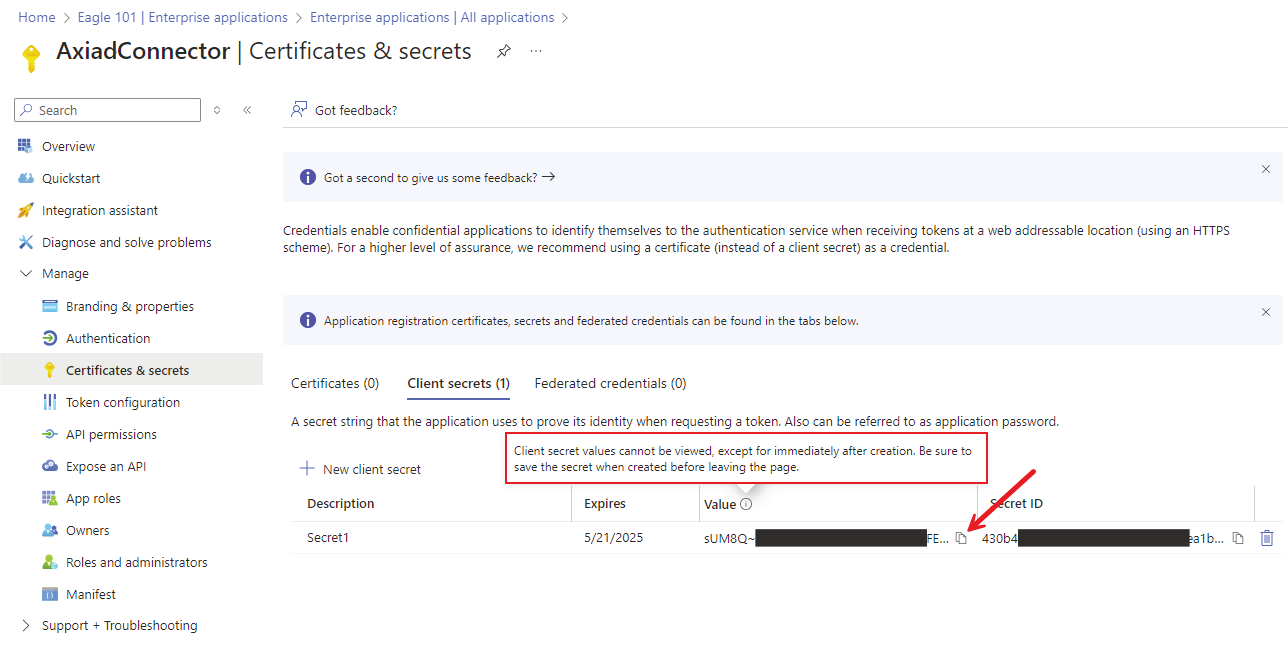
Under Manage in the menu, select Certificates & secrets.
-
Select New client secret.
-
On the Add a client secret page, provide a Description, set Expires to the expiration time, and then select Add.
-
After the secret is created, copy the Value from the Certificates & secrets page.
ImportantYou can only copy this value immediately after creating it, and it's required for the Axiad Mesh configuration steps. Be sure to copy this value now — you won't have another opportunity, and you would need to create a new client secret instead.
Axiad Mesh configuration steps
You can integrate your Entra ID IdP with Axiad Mesh in the initial onboarding process as the primary IdP, or as a secondary IdP after you've configured another IdP as the primary IdP.
For more information about the initial onboarding process, see the getting started guide.
Initial onboarding configuration
If you're adding Entra ID as your primary IdP during your initial onboarding, complete the following steps.
-
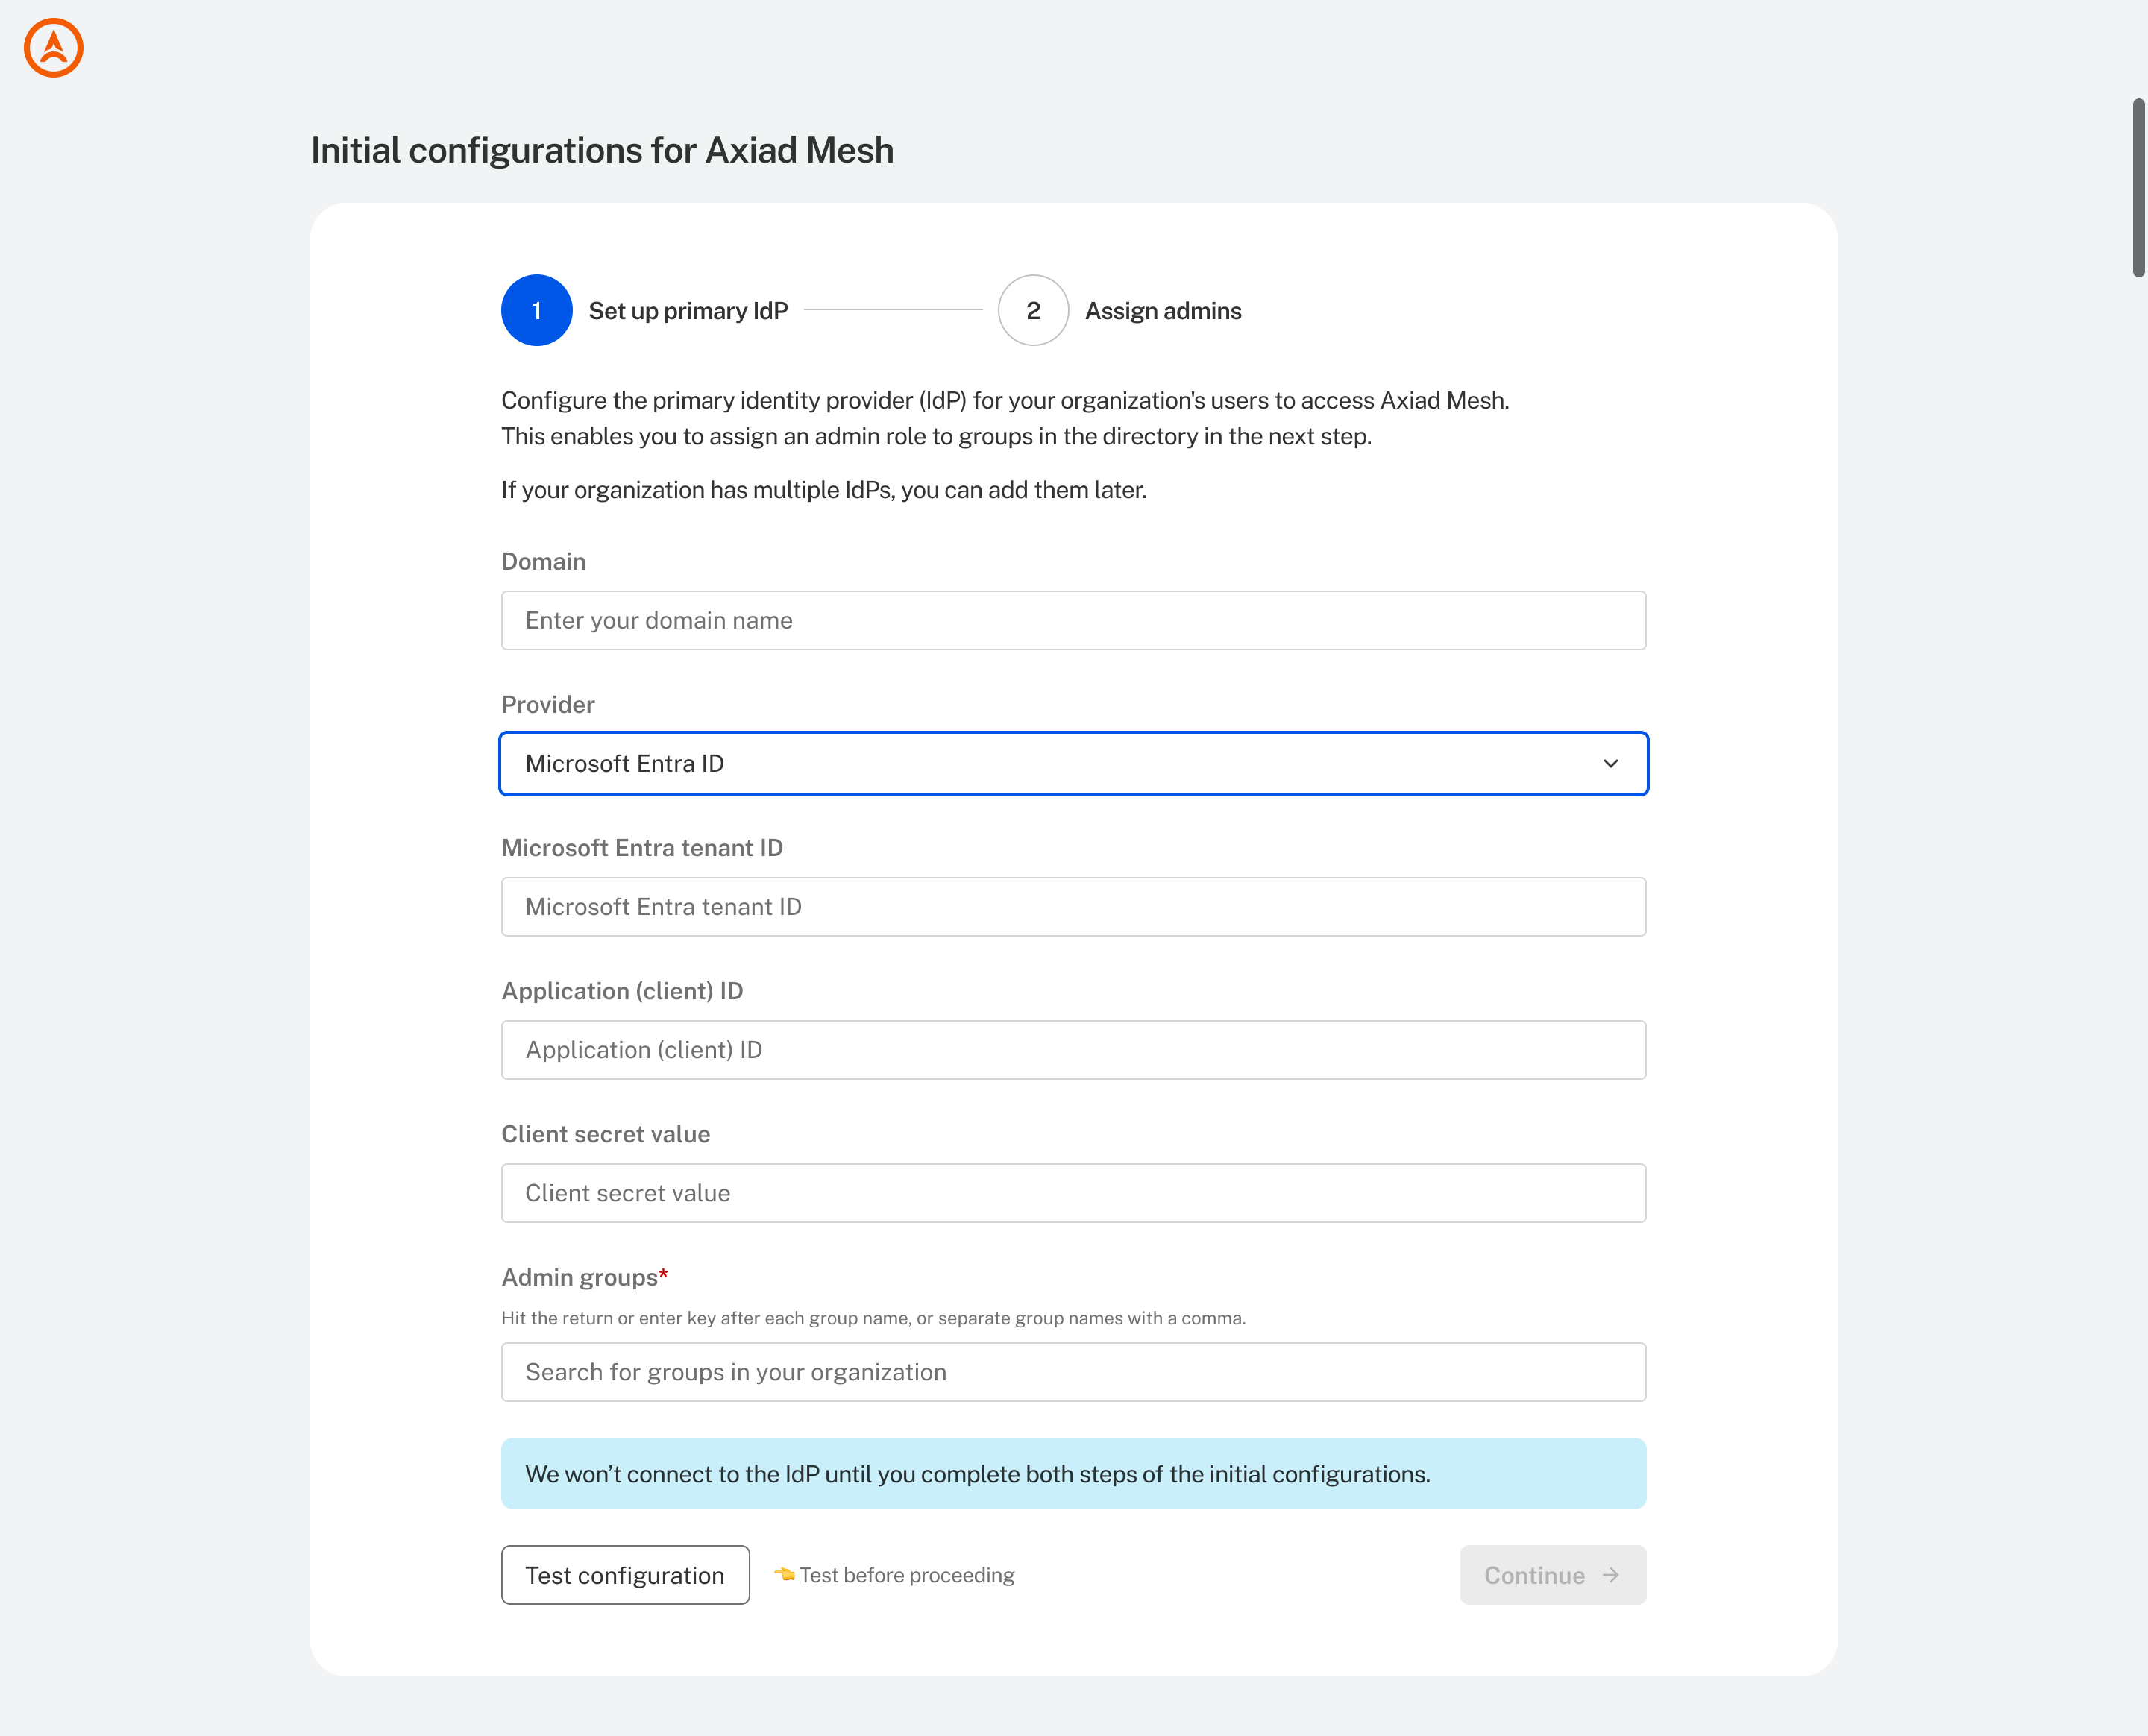
After you open the access link from the Axiad Mesh welcome email, you're prompted to set up your primary IdP.
-
Set the Domain to the domain of your Entra ID environment. This value must match the
domainquery parameter of the redirect URI you registered in Add the redirect URI exactly. -
Select Microsoft Entra ID from the Provider dropdown.
-
Set the Microsoft Entra Tenant ID to the Tenant ID of your Entra ID environment. Learn how to locate your Tenant ID.
-
Fill in the fields with the values copied in the Entra ID configuration steps:
- Set the Application (client) ID to the Application ID value copied in Configure application properties, step 8.
- Set the Client secret value to the Value copied in Generate a client secret, step 8.
-
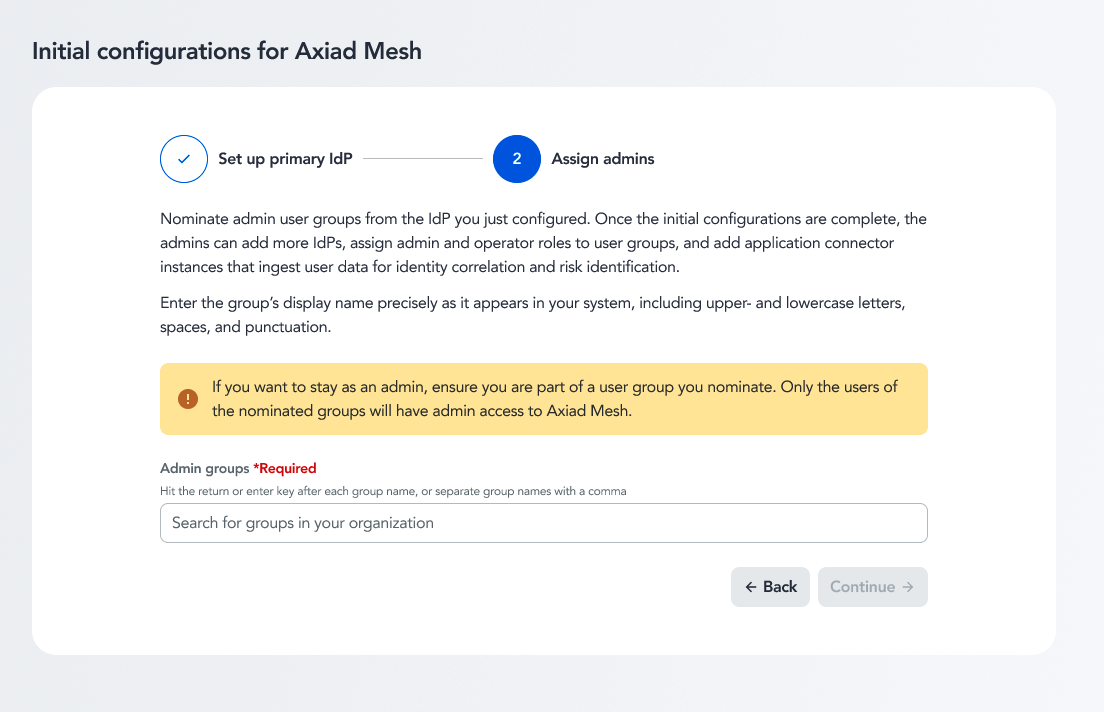
On the next screen, set the Admin groups to the object IDs of the groups whose members should be Axiad Mesh admins, as copied in Assign users and groups, step 6.
Enter object IDs, not group namesBecause you set the groups claim to Group ID, Entra ID reports each group as an object ID — a GUID, shown in the group's Overview page as Object Id. Axiad Mesh matches these values exactly, so a display name such as
Mesh Adminsnever matches and the admin role is not granted.Entra ID group limitationsOnly users that are in the groups included in the Assign users and groups section can access Axiad Mesh. For any groups you add here, be sure that the users are members of any group limitations made in Entra ID.
-
Select Continue, and you're signed in to the Axiad Mesh portal for the first time.
Secondary IdP configuration
If you already have your initial IdP connected and need to add a new one, or you need to replace the existing one, you can connect your Entra ID IdP from the Axiad Mesh administrative portal.
-
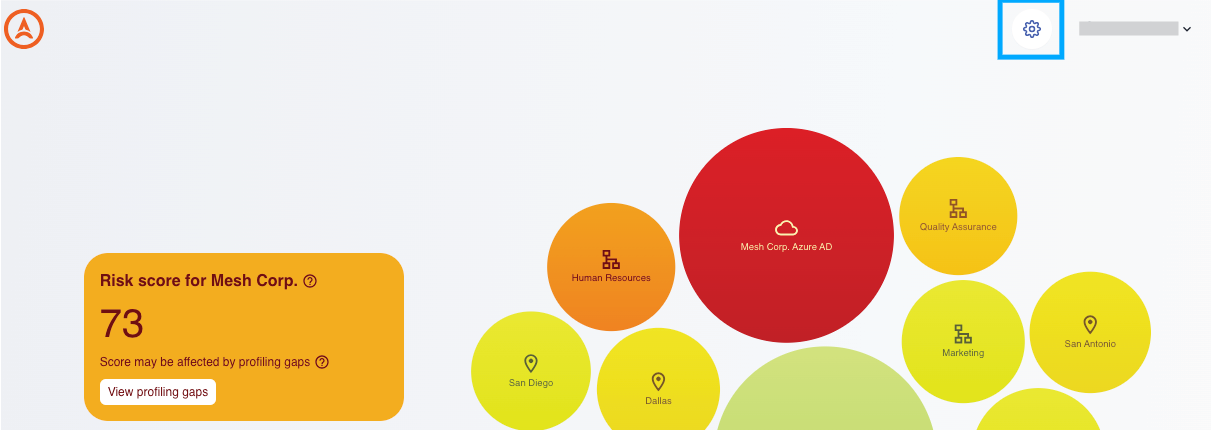
From the homepage, select the gear icon to open the Settings page.
-
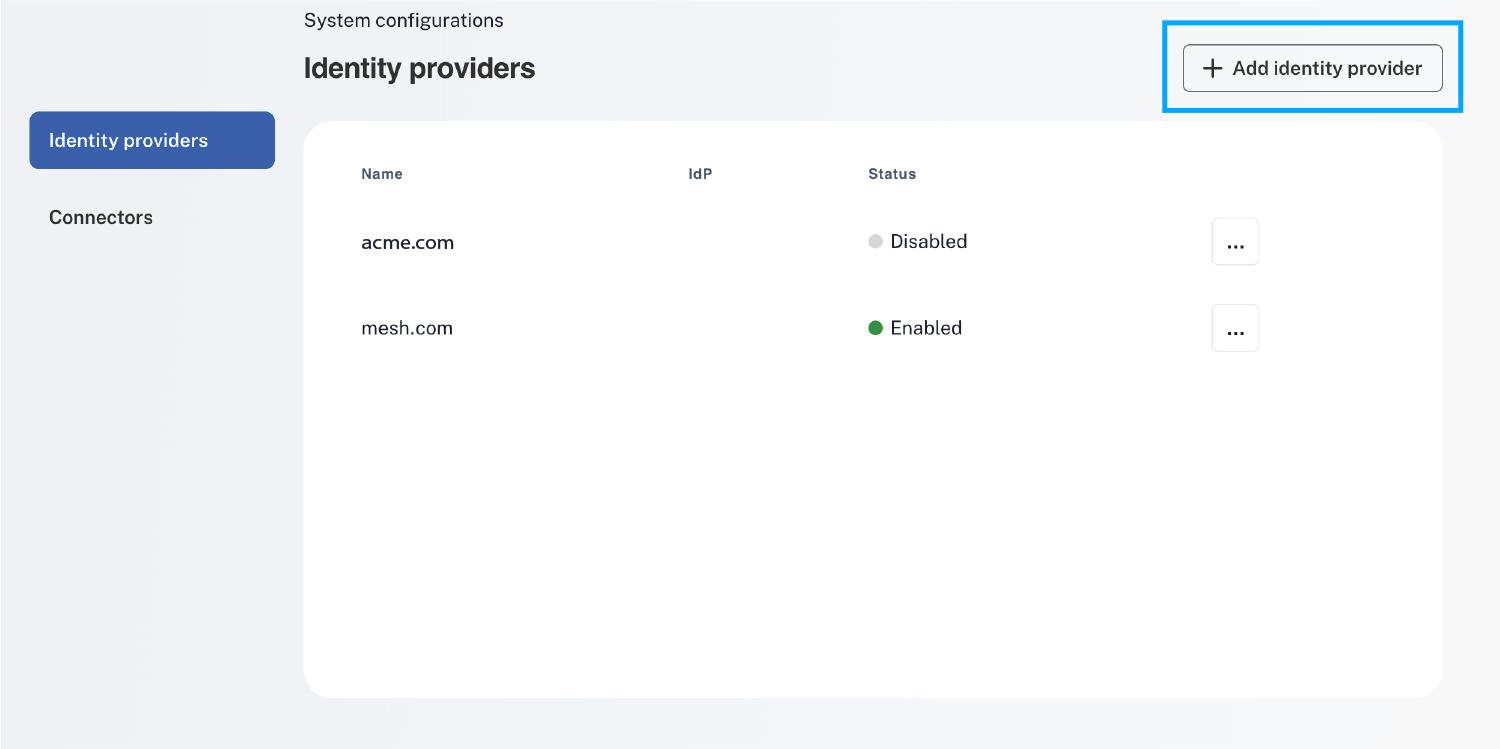
Select Identity providers from the left menu and select + Add identity provider.
-
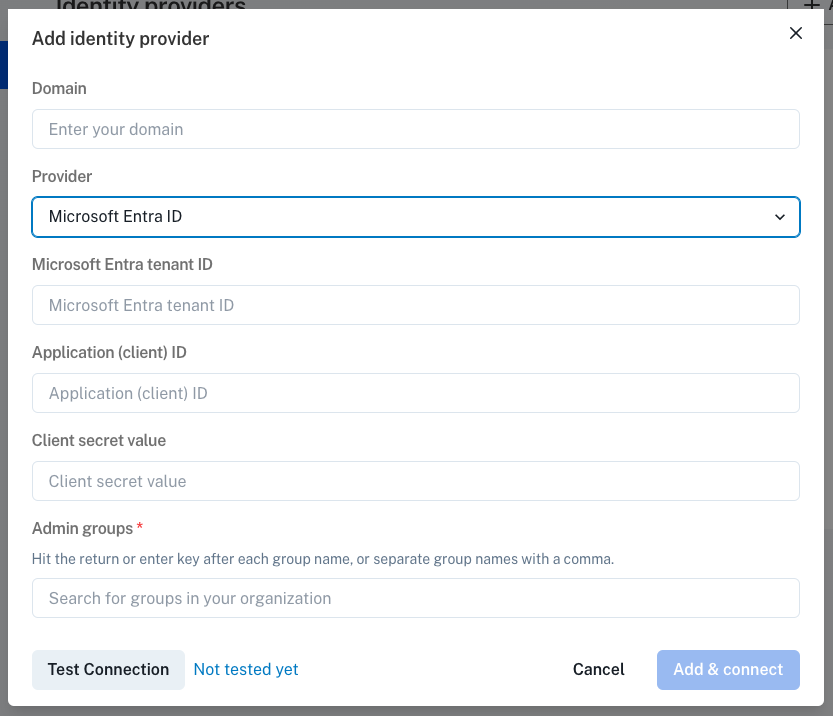
On the Add identity provider page, set the Domain to the domain of your Entra ID environment. This value must match the
domainquery parameter of the redirect URI you registered in Add the redirect URI exactly. -
Select Microsoft Entra ID from the Provider dropdown.
-
Set the Microsoft Entra Tenant ID to the Tenant ID of your Entra ID environment. Learn how to locate your Tenant ID.
-
Fill in the fields with the values copied in the Entra ID configuration steps:
- Set the Application (client) ID to the Application ID value copied in Configure application properties, step 8.
- Set the Client secret value to the Value copied in Generate a client secret, step 8.
-
Set the Admin groups to the object IDs of the groups whose members should be Axiad Mesh admins, as copied in Assign users and groups, step 6.
Enter object IDs, not group namesBecause you set the groups claim to Group ID, Entra ID reports each group as an object ID — a GUID, shown in the group's Overview page as Object Id. Axiad Mesh matches these values exactly, so a display name such as
Mesh Adminsnever matches and the admin role is not granted.Entra ID group limitationsOnly users that are in the groups included in the Assign users and groups section can access Axiad Mesh. For any groups you add here, be sure that the users are members of any group limitations made in Entra ID.
-
After the fields are filled out, select Test Connection.
-
Upon a successful test, select Add & Connect.
-
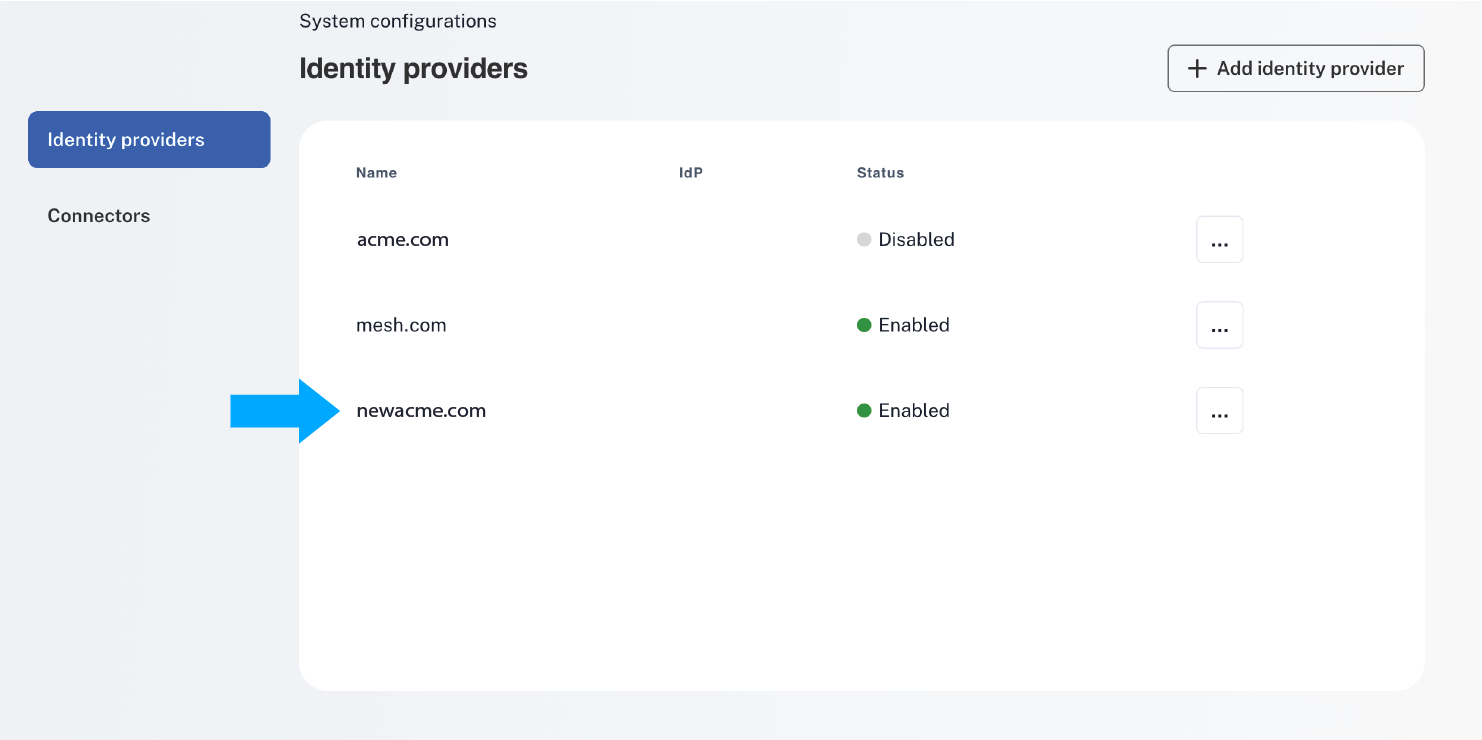
After the setup completes, the new IdP is listed on the Identity providers page.