Set up an on-prem connector
This guide is for Mesh administrators. You'll register an edge agent, hand its install command to your agent operator, then add and test connectors once the agent is online.
If you're the person who runs the agent on a server, see Run the edge agent instead.
Before you begin
- A Mesh administrator account with permission to manage connectors.
- An agent operator — someone who can run a container on a host inside your network. That host needs Docker installed and running. You'll hand them a command; they can start as soon as you issue it.
- Details for the internal system you want to connect: its base URL and how it authenticates (for example, an API token).
The token you're about to issue is short-lived, so confirm your operator is ready — and that Docker is running on their host — before you issue it.
Step 1 — Open On-prem agents
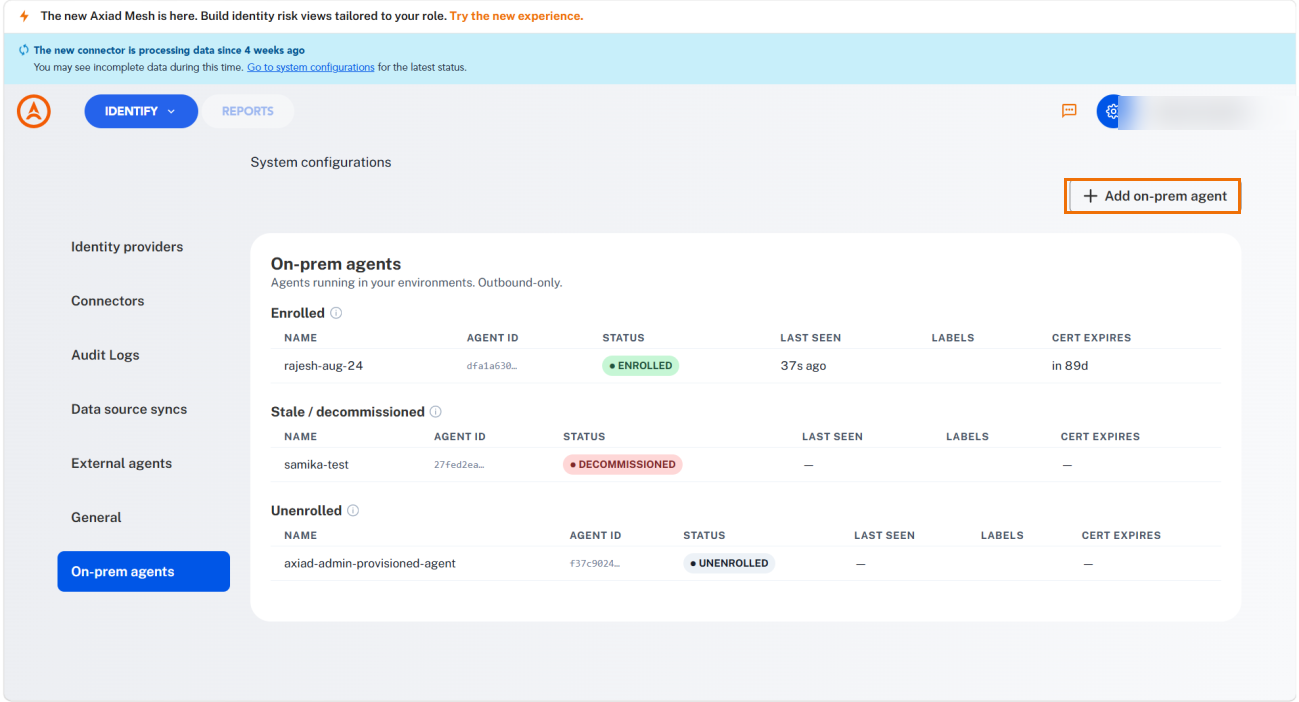
In the Mesh dashboard, go to System configurations > On-prem agents. This page lists the agents running in your environments, grouped by state — Enrolled, Stale / decommissioned, and Unenrolled — and notes that they are outbound-only. If you haven't added one yet, you'll see "No on-prem agents yet."
Step 2 — Register an agent
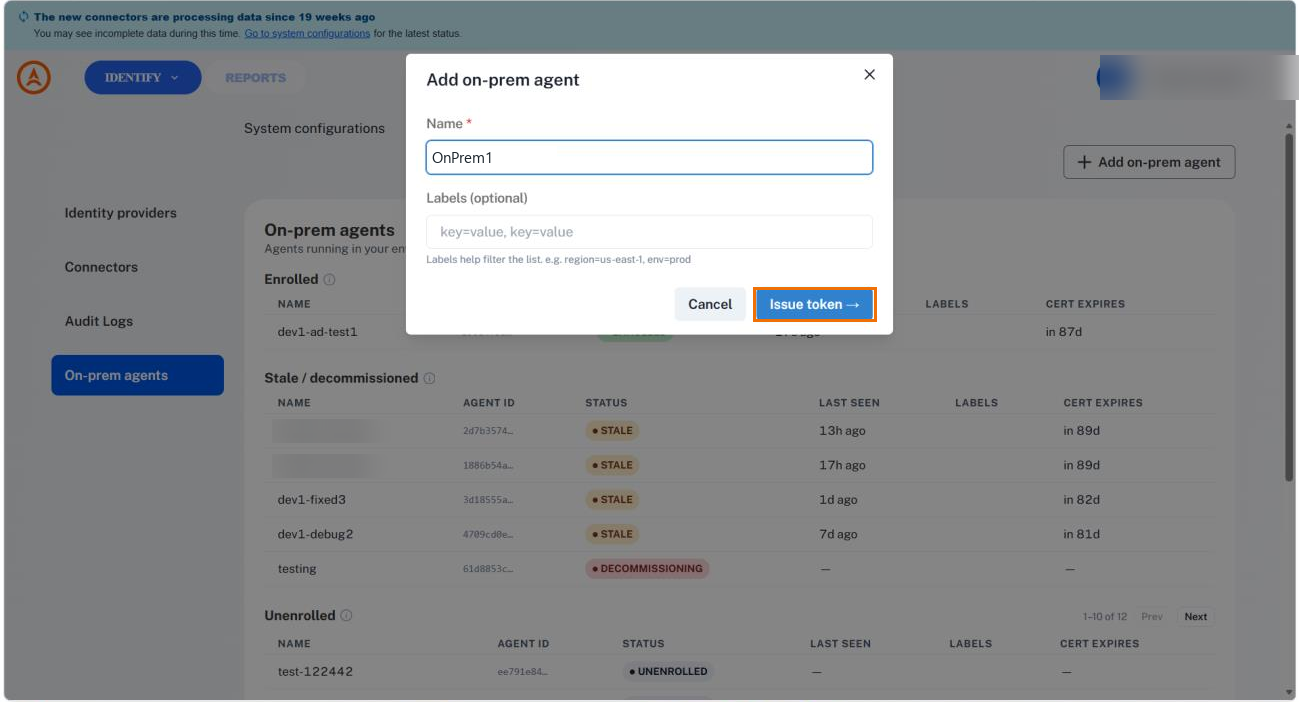
Select Add on-prem agent. In the dialog:
- Name — a name you'll recognize later, for example
OnPrem1. - Labels (optional) —
key=valuepairs that help you filter the list, for exampleregion=us-east-1, env=prod.
Select Issue token →.
Step 3 — Copy the token and command
Mesh shows a one-time enrollment token and a ready-to-run command:
- Enrollment token — select Copy.
- Run on the customer host — the full command your operator runs. Select Copy in the top-right of the command block.
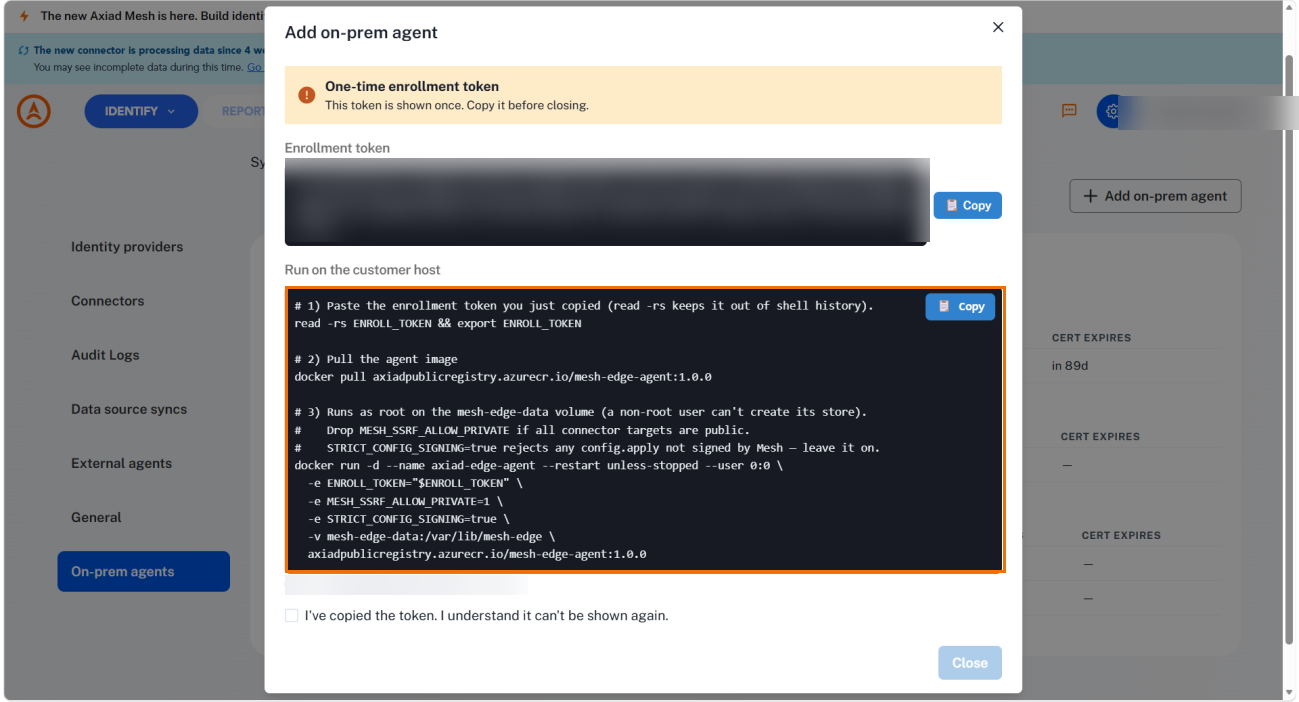
The enrollment token is shown once. Copy it before you close the dialog — otherwise you'll need to register the agent again to get a new one.
Send both the token and the command to your agent operator over a secure channel. They'll follow Run the edge agent.
Tick "I've copied the token. I understand it can't be shown again.", then select Close.
The token is valid for 15 minutes and can be used only once. If it expires before your
operator creates the agent, their container logs enroll: ENROLL_TOKEN expired and the
agent stays Unenrolled here. An expired token can't be reused — add the agent again
to issue a fresh one.
You don't need to decommission the unenrolled attempt first — issuing a new token always works and creates a separate agent entry. It's fine to leave the failed one sitting as Unenrolled, or decommission it later for tidiness; neither is required before retrying.
Step 4 — Wait for the agent to come online
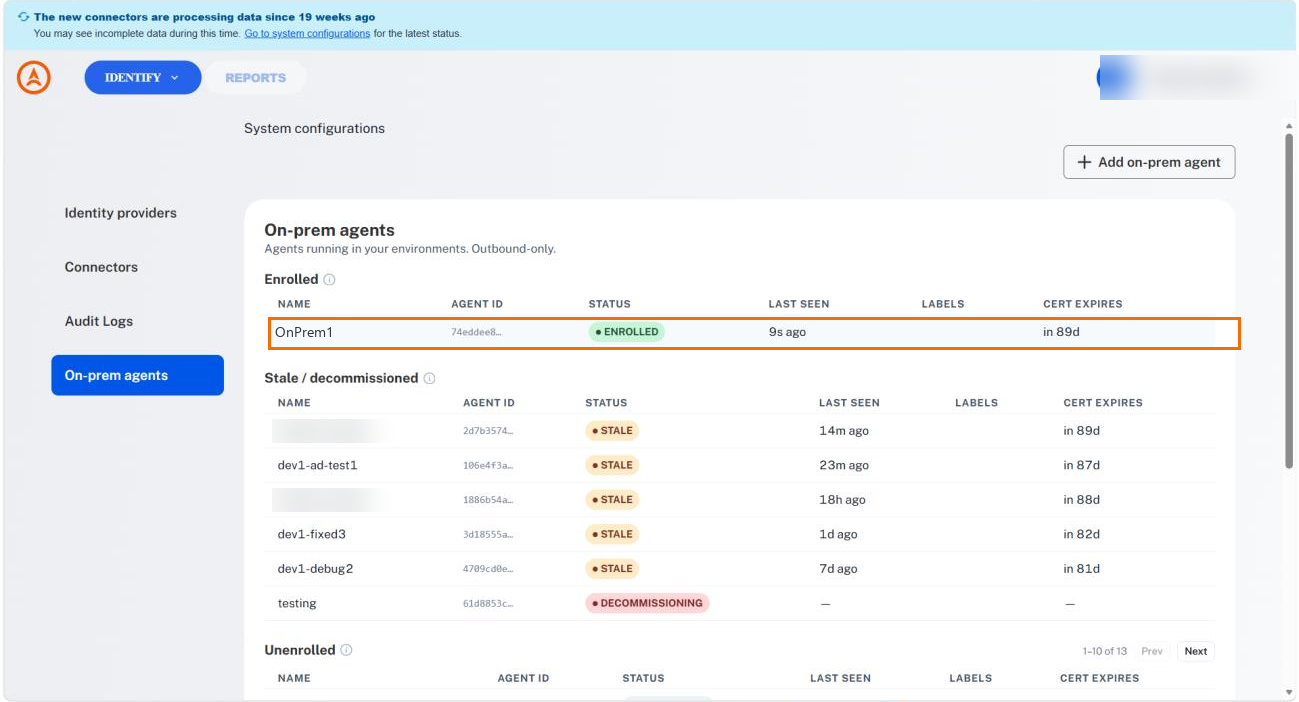
Back on the On-prem agents list, your agent appears with a Status. Once your operator runs the command, the status turns Enrolled within a minute or so.
| Status | Meaning |
|---|---|
| Unenrolled | Registered, but hasn't connected yet. |
| Enrolled | Connected and healthy. |
| Stale | Was enrolled, but hasn't checked in recently. |
| Decommissioning / Decommissioned | Being shut off / no longer trusted. |
The list also shows each agent's Agent ID, Last seen, Labels, and Cert expires.
An agent's certificate is valid for 90 days from enrollment, and the agent renews it automatically about 7 days before it would expire — the Cert expires column is informational, not something you need to act on. It only becomes relevant if an agent has been offline for the full 90-day window without reconnecting; then its certificate genuinely lapses and it needs a fresh enrollment token to come back.
Step 5 — Add a connector to the agent
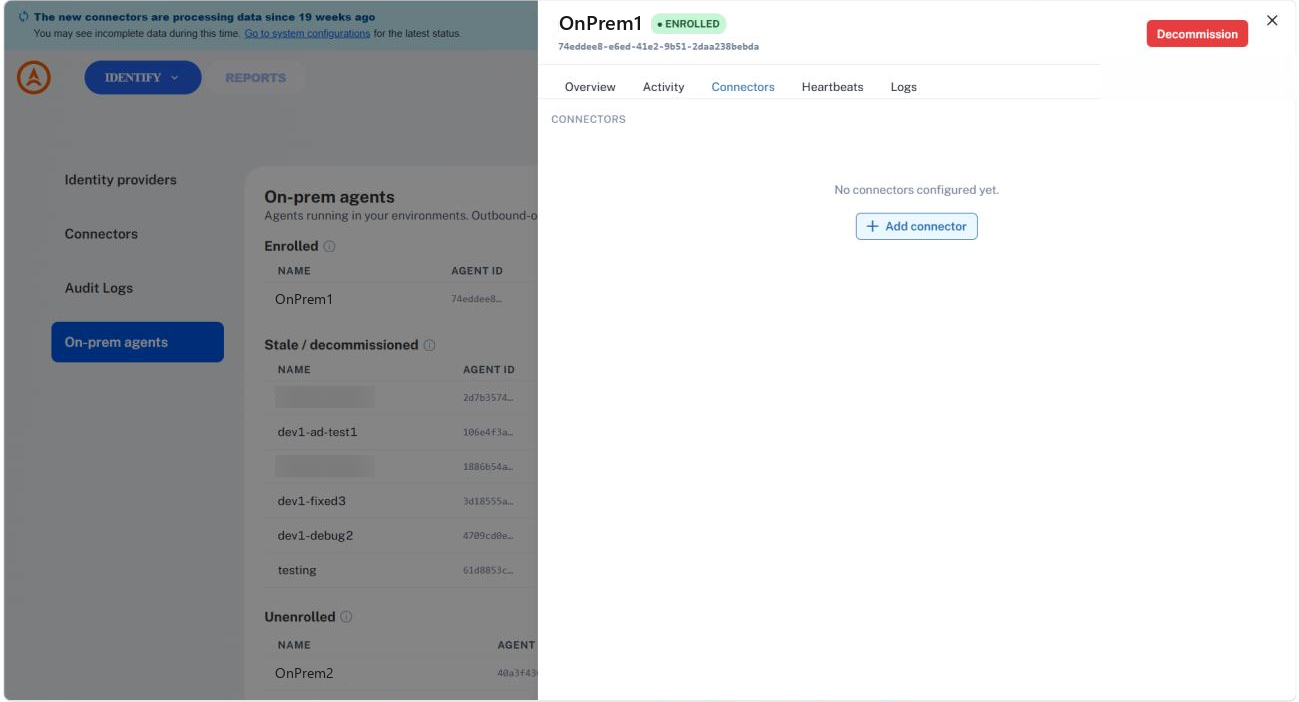
Select the agent's row to open its details, then open the Connectors tab and select + Add connector.
Choose a connector type:
- Active Directory (LDAP/LDAPS) — for an on-premises directory.
- Universal REST Connector — for any internal system with an HTTP API.
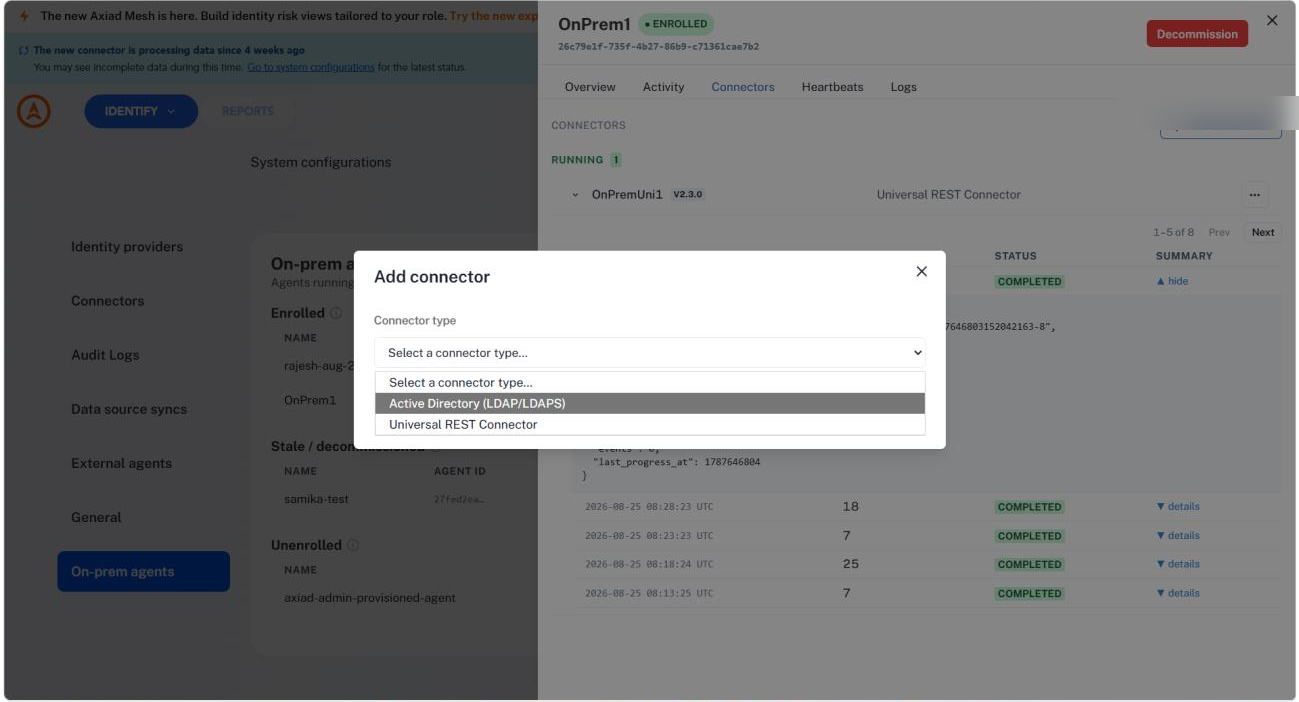
Both flows are covered below.
Active Directory (LDAP/LDAPS)
Choose Active Directory (LDAP/LDAPS) to ingest users, groups and devices from an on-premises domain controller through the edge agent.
Give the connector a display name — it distinguishes this connector from others of the same type on the same agent — and leave the build version at latest unless you have a reason to pin an older one. Then fill in the connection:
- Domain controller — the host Mesh should reach, resolved from the agent's network. A hostname or an IP address both work equally well.
- Port —
636for LDAPS and389for plain LDAP are the common cases, but any port is accepted — for example, a Global Catalog port (3268plain,3269over TLS) if that's what you need to reach. - Use LDAPS (TLS) — keep this on.
- Skip certificate check — leave this off in production. Turn it on only against a lab domain controller with a self-signed certificate.
LDAPS here only means the connection itself is encrypted. Authentication is still the username and password you provide below, sent over that encrypted channel — there's no client certificate to install or manage on your side.
Today, one connector talks to exactly one domain controller — there's no built-in failover or load balancing across multiple DCs. If you need resilience across DCs, point this field at an address you load-balance yourself (a VIP or DNS round-robin); the connector itself doesn't manage that.
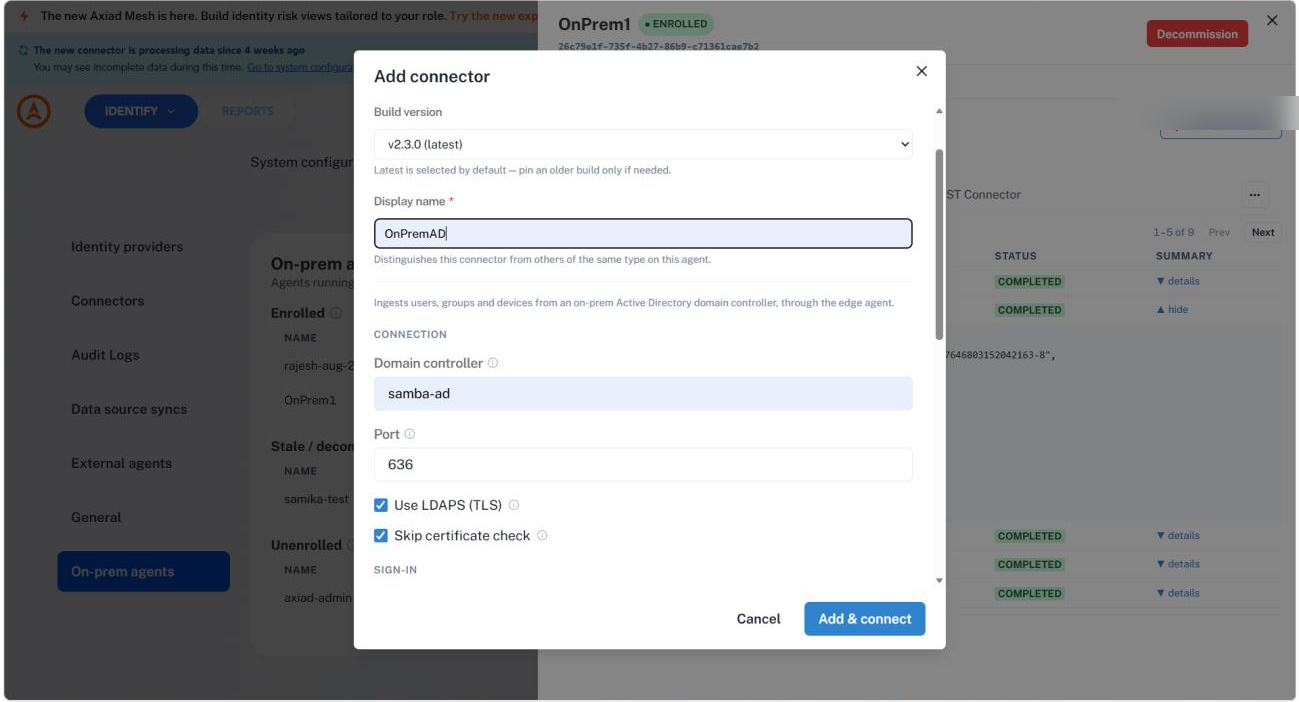
Below that, provide the sign-in credentials for the account Mesh binds as, then set what to sync:
- Base DN — where in the directory to read from, for example
DC=example,DC=local. - Sync every — how often the connector runs.
- Include devices and Include Group Policy — extend the sync beyond users and groups.
The dialog tests the connection as you fill it in, and reports each check separately — name resolution, the LDAPS connection, the TLS handshake, the bind, whether the base DN is reachable, and whether delta sync is available. Where DirSync is available, each run fetches only what changed since the last one — this uses Active Directory's own change-tracking (the same USN-based mechanism you may already know from other tools), so there's no separate cursor for you to manage. One behavior worth knowing: a run has to complete successfully for that checkpoint to save. If a run is interrupted partway through, the next run starts over from scratch rather than resuming where it left off.
What gets collected
The connector reads four kinds of data, each with a fixed set of fields — this isn't currently customizable per connector:
- Users — name, email, job title, phone/mobile, department, employee ID, address, manager, and last login, plus a few technical fields used to classify service accounts correctly.
- Groups — identity and membership only.
- Devices (Include devices) — machine name, hostname, operating system and version, creation date, last login, and group memberships.
- Group Policy (Include Group Policy) — a policy's name, version, and which organizational units it's linked to. This does not include the policy's actual content (registry settings, scripts, security rules), which lives outside what this connector reads, and it doesn't calculate whether a policy is actually in effect for a given user or device — linkage is reported as-is, not as a computed conclusion.
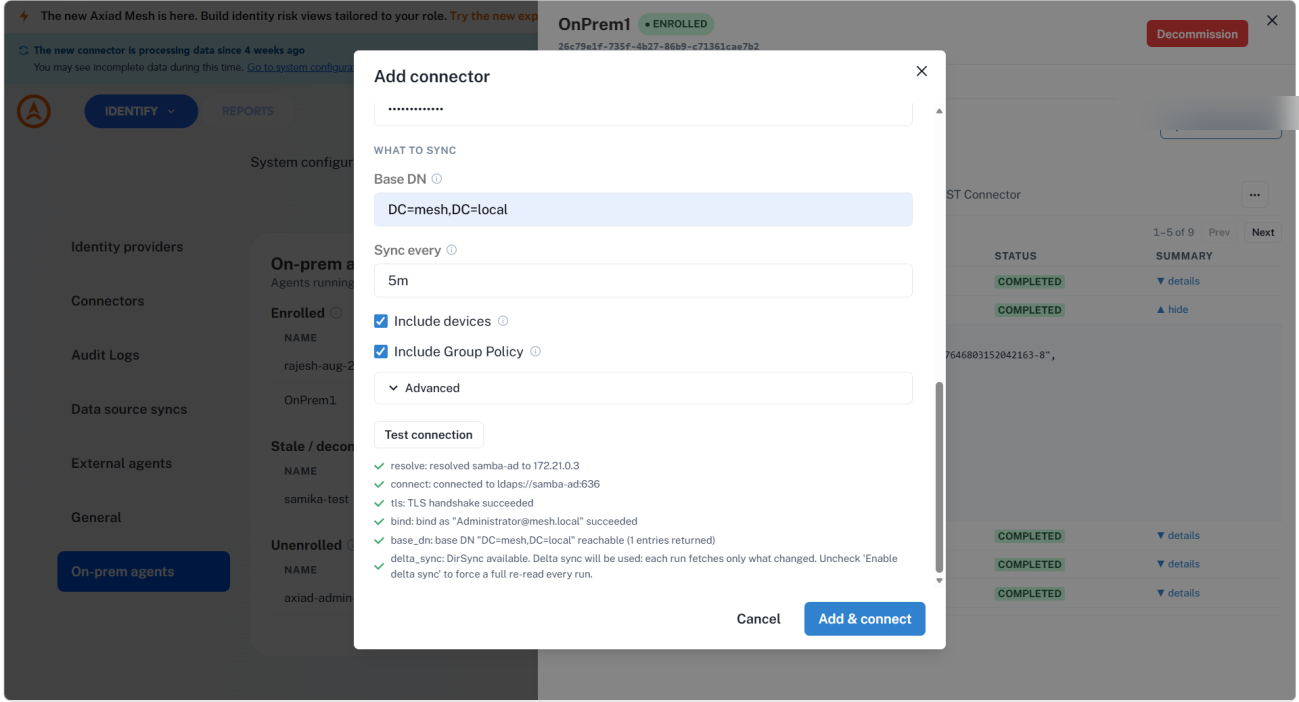
When every check passes, select Add & connect.
Universal REST connector
Choose Universal REST Connector for any internal system with an HTTP API. The wizard runs in six steps.
Step 1 of 6 — Choose how to start
Give the connector a name — this is what you'll see in the connector list and audit logs — and pick a build version (take the one marked latest unless you have a reason not to).
Then tell the wizard what it has to work with:
- OpenAPI / Swagger spec — recommended. Paste, upload, or fetch a 2.0 or 3.0.x document.
- Endpoint list + sample responses — for systems without a published spec.
- Credentials + base URL only — Mesh probes the API and discovers fewer endpoints.
Supply the spec by uploading a file or fetching it from a URL, then set the Base URL of the system Mesh should call.
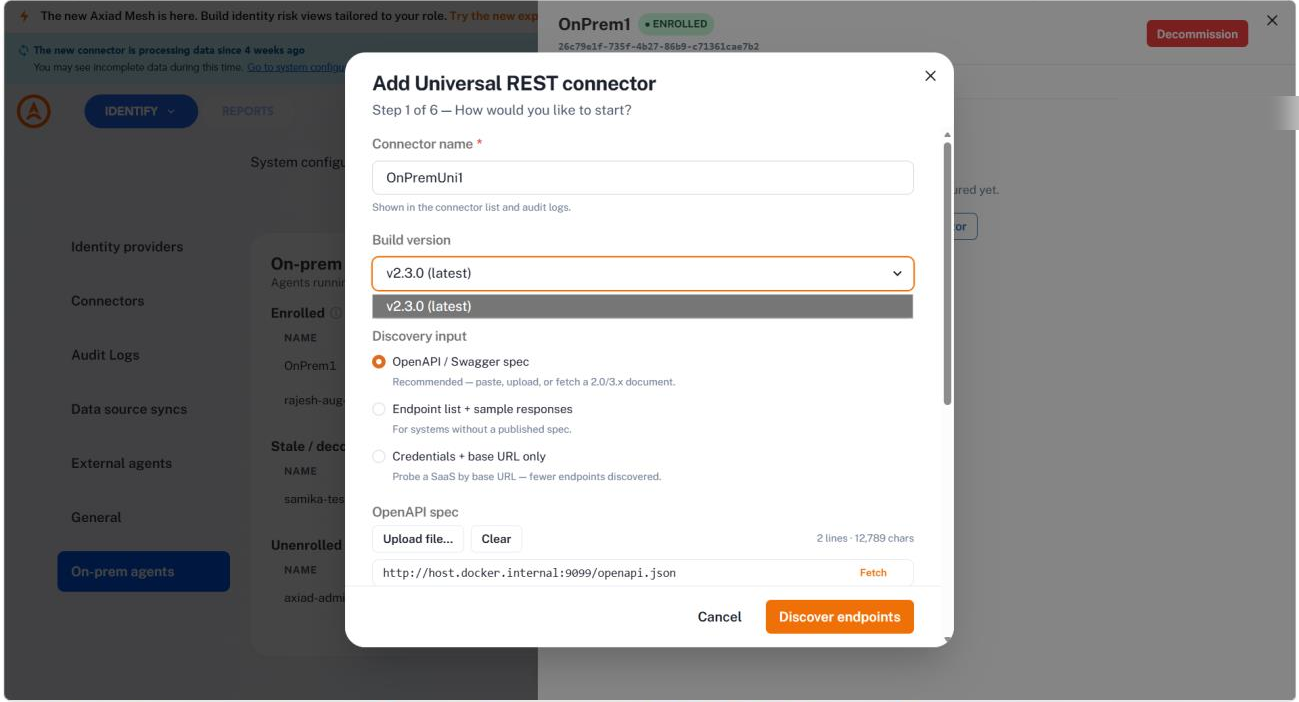
Select Discover endpoints.
Step 2 of 6 — Review discovery results
Mesh reports what it found: how it classified the system, the source it used, how many endpoints it detected, and the auth scheme the spec declares.
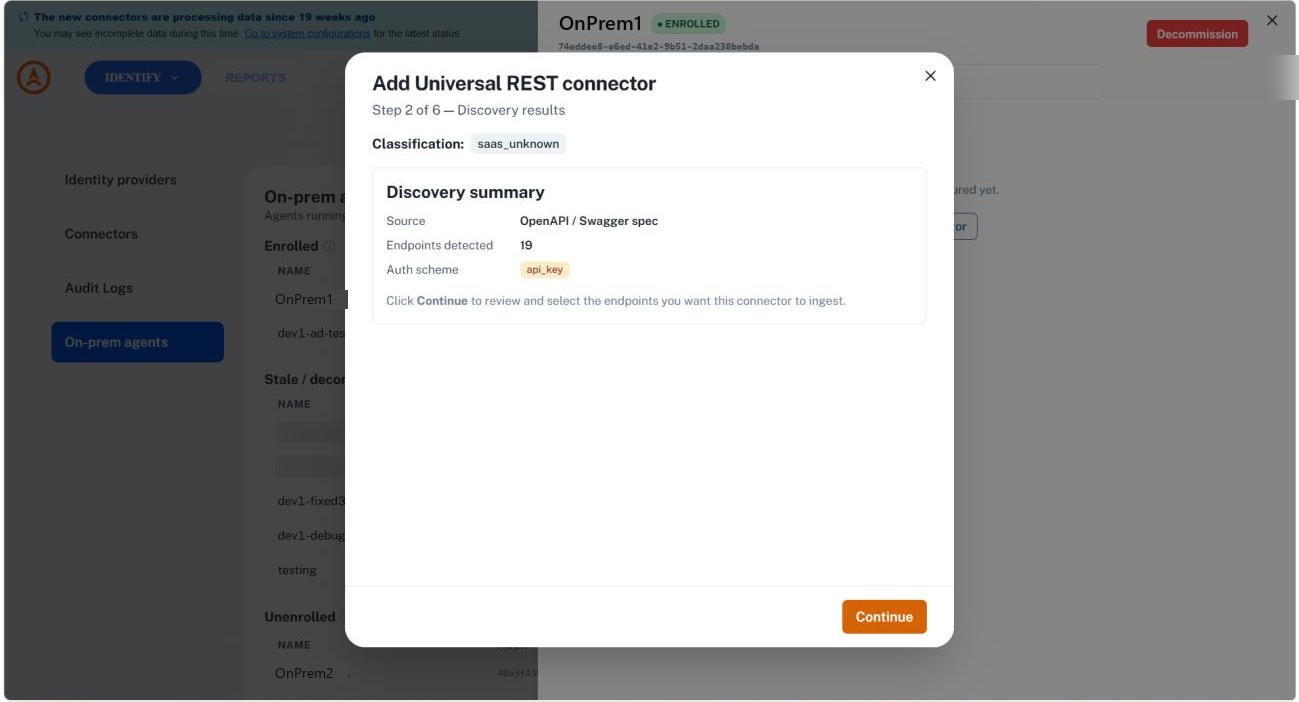
Select Continue.
Step 3 of 6 — Confirm endpoints
Choose which endpoints this connector should ingest. Each one is tagged with the kind of data it returns and a risk score. Endpoints Mesh can't ingest are greyed out with the reason shown — for example a health check that returns no data, or a method that isn't supported yet.
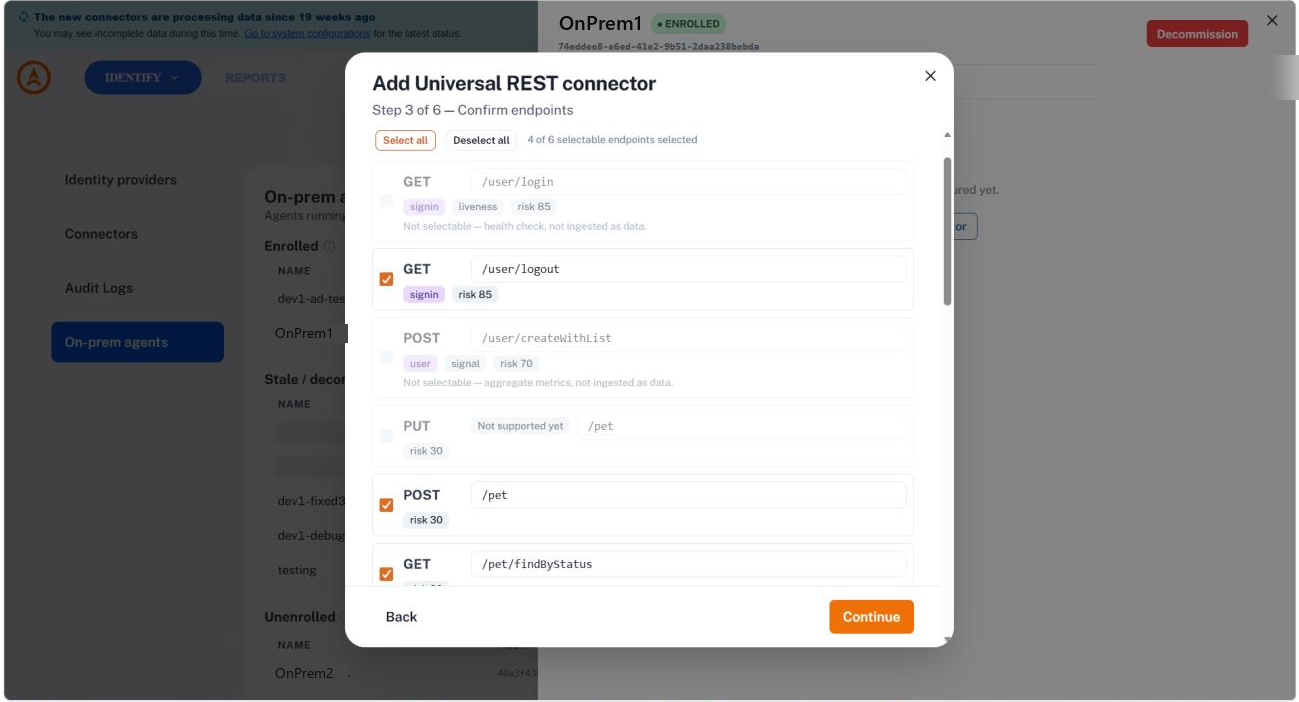
Select Continue.
Step 4 of 6 — Set the sync strategy and authentication
Set a strategy per endpoint — whether each run is incremental or a full read, and the page size — then a sync frequency for the connector as a whole.
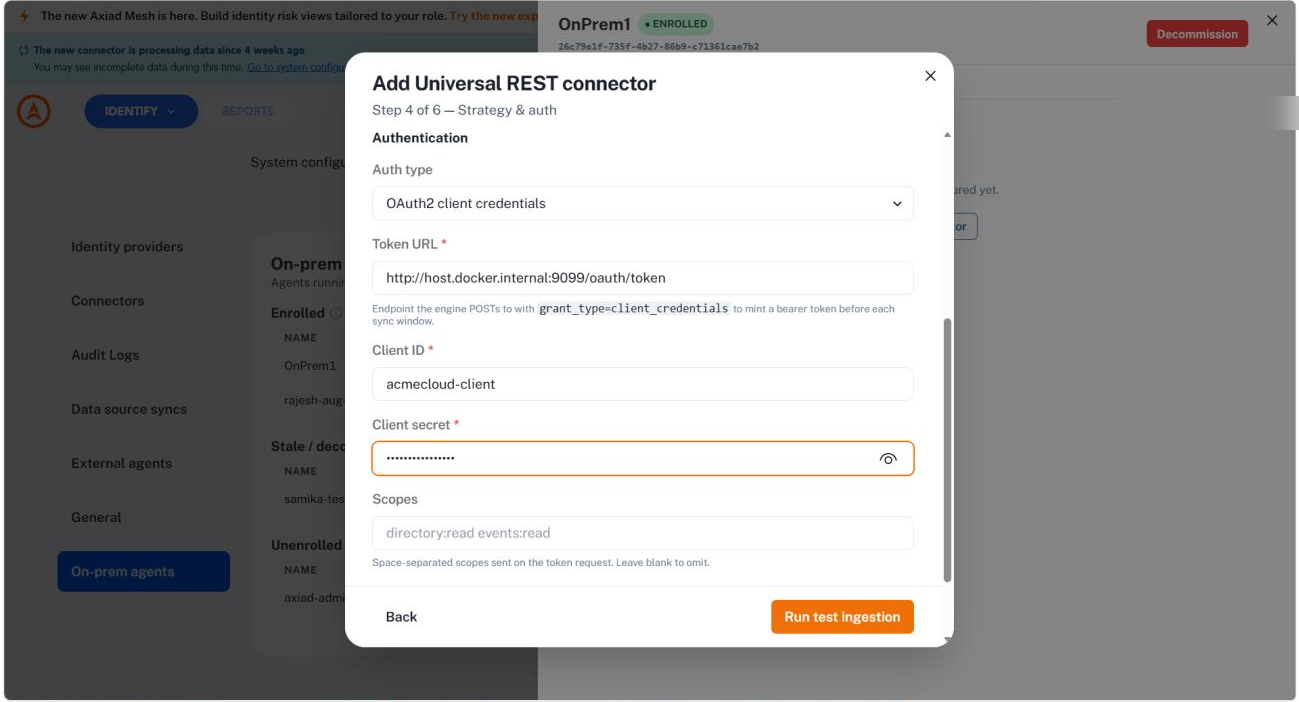
Then choose the auth type and enter the credential. Mesh supports Bearer token, API key, Basic, OAuth2 client credentials, OAuth2 authorization code (BYO token), mTLS, and SAML token.
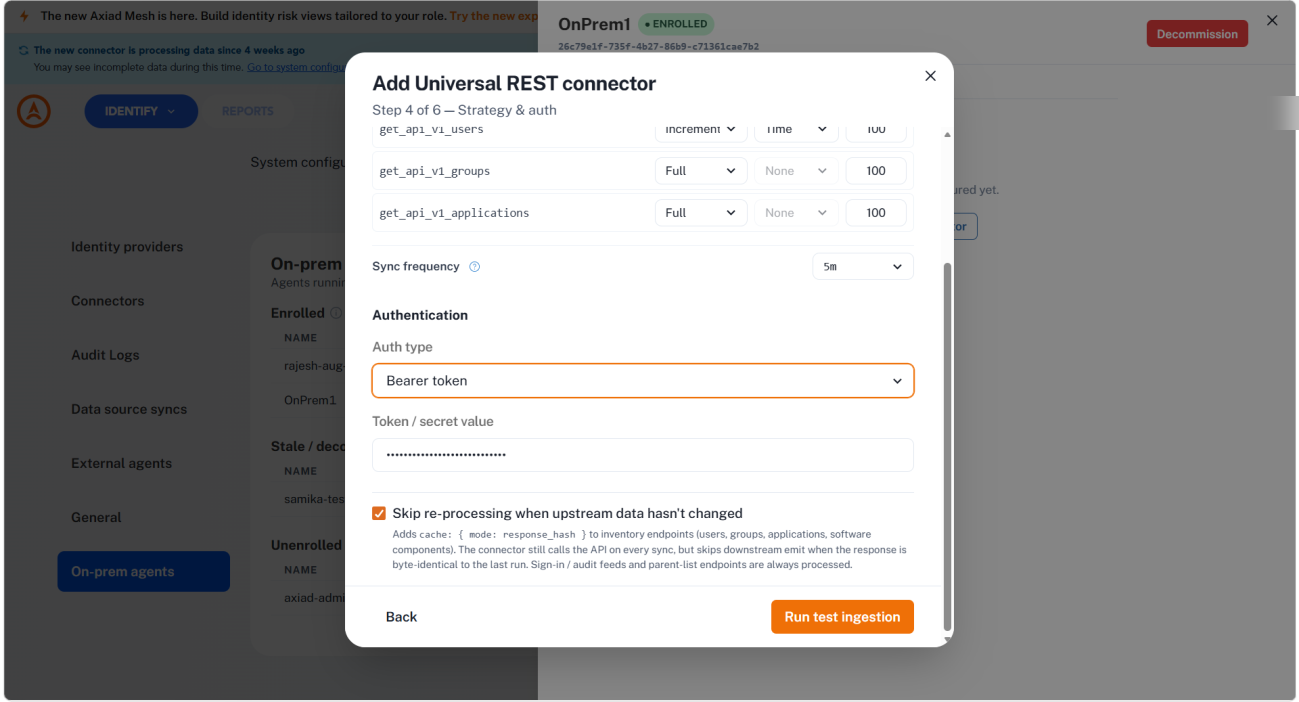
The fields change with the auth type. OAuth2 client credentials, for example, asks for the token URL, client ID and secret, and optional scopes; Mesh mints a bearer token before each sync window.
Skip re-processing when upstream data hasn't changed is worth leaving on: the connector still calls the API every sync, but skips emitting downstream when the response is byte-identical to the last run.
Without a valid token or secret, the target API rejects every request and the test returns 0 records with no obvious cause.
Select Run test ingestion.
Step 5 of 6 — Test the ingestion
The test runs on the agent — inside your network — so it can reach systems that aren't publicly accessible. Mesh reports the outcome for each endpoint it called, along with the connector template it generated.
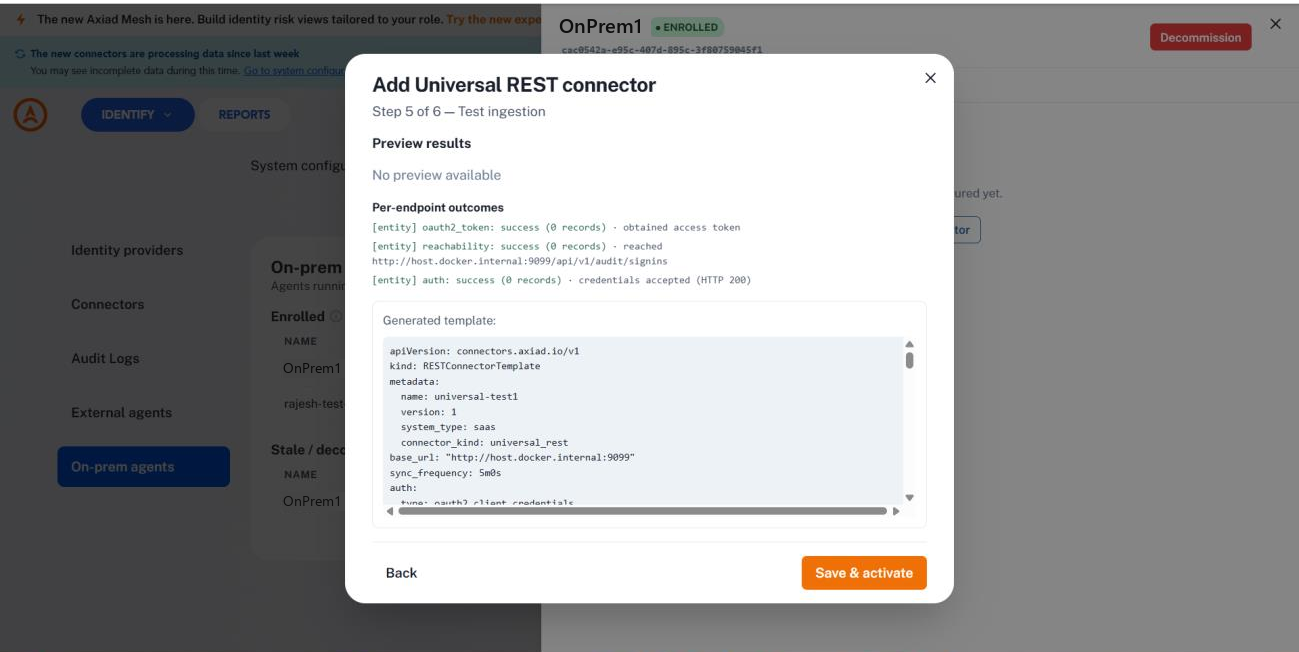
- If every check succeeds, select Save & activate.
- If a check fails, the outcome names what to fix — an unreachable host, a rejected credential — and you can go Back to correct it.
Confirm the connector is running
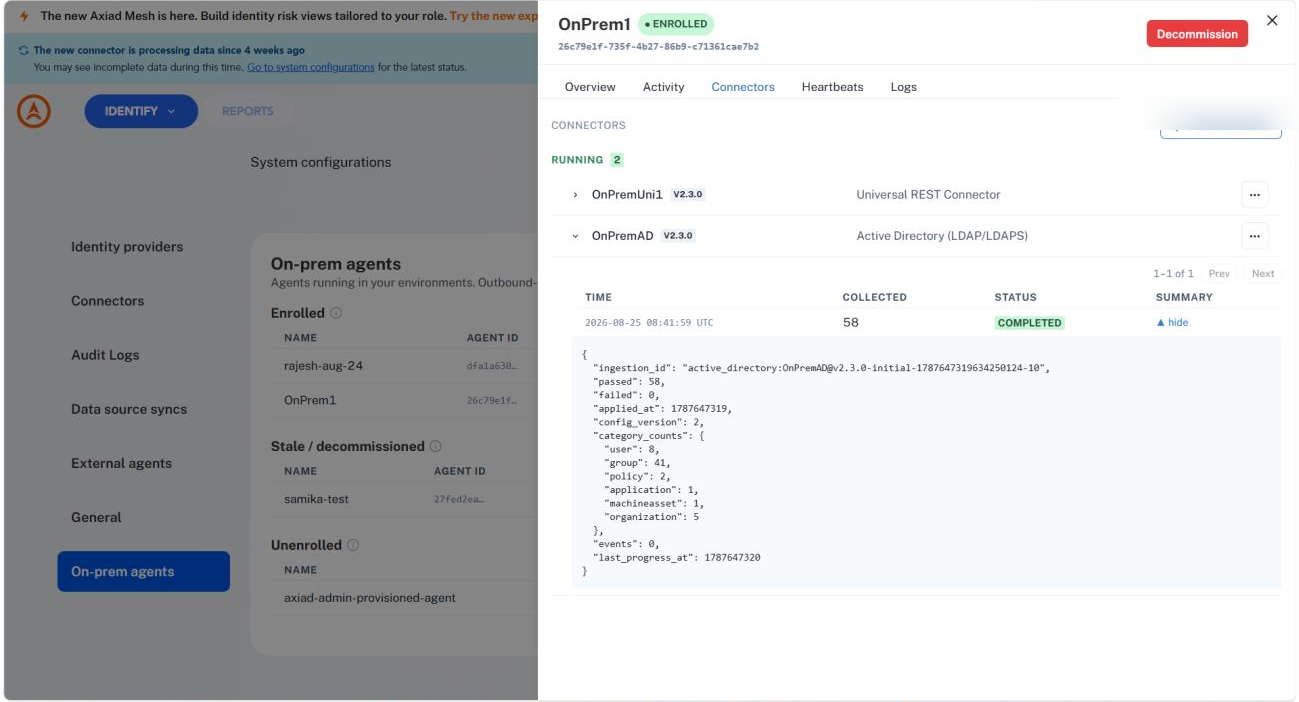
The connector appears on the agent's Connectors tab under Running, with its version and type. Expand it to see each collection run — when it ran, how many records it collected, and whether it completed — and open details for the per-category breakdown.
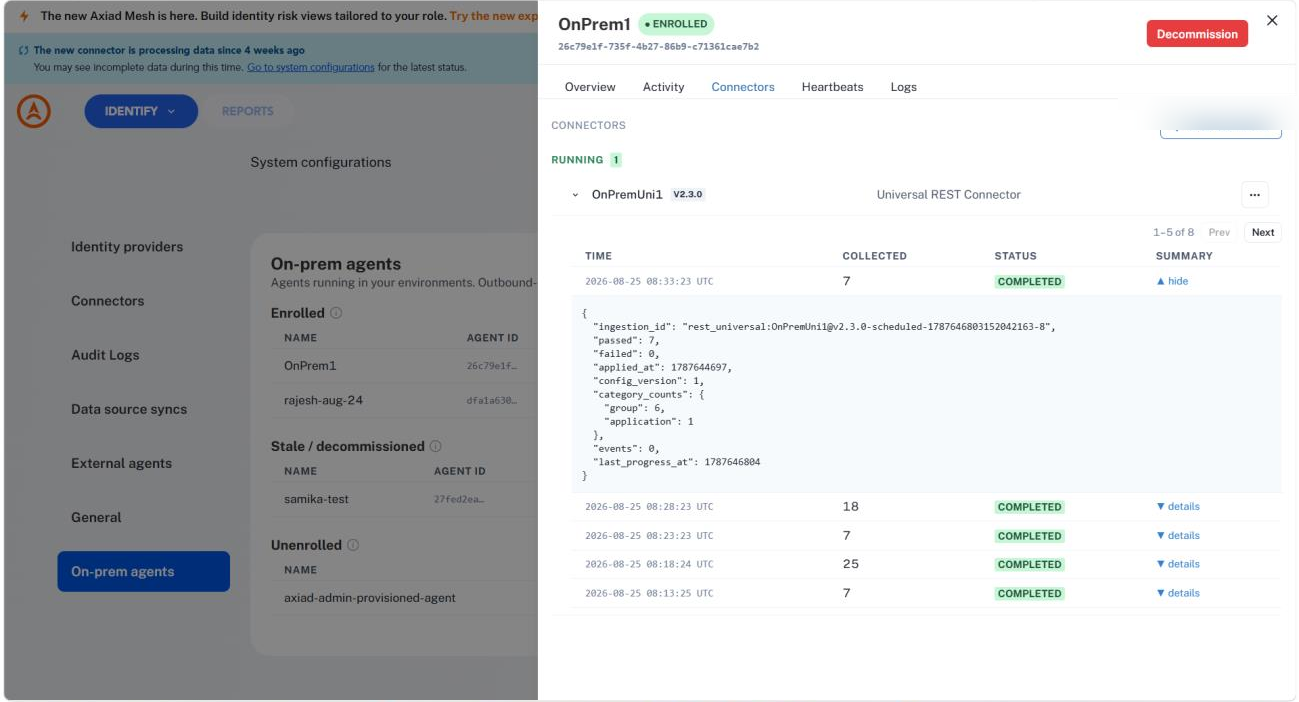
Connectors on an agent are grouped by status: Running, Pending, Failed, and Disabled. One agent can serve several connectors at once.
Managing an agent
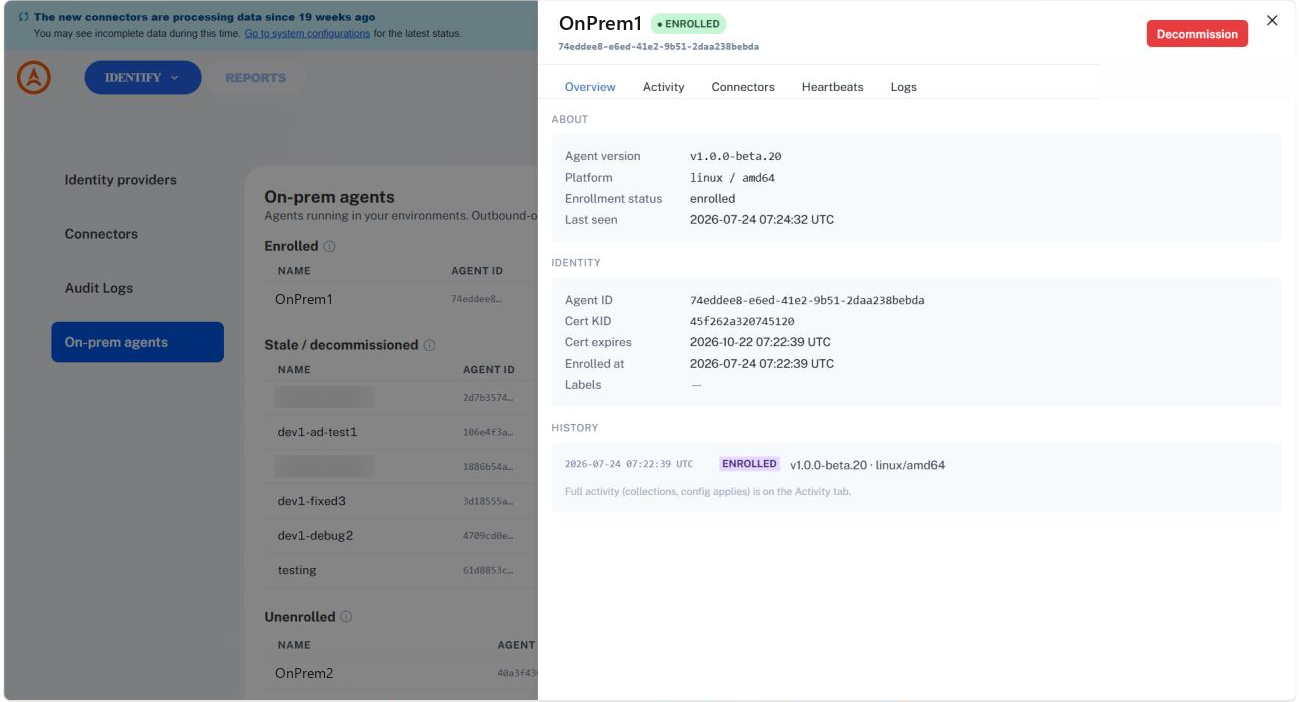
Open an agent to see its details across several tabs:
- Overview — agent version, platform, when it enrolled, when it was last seen, its agent ID, certificate details, and its labels.
- Connectors — the connectors running on this agent.
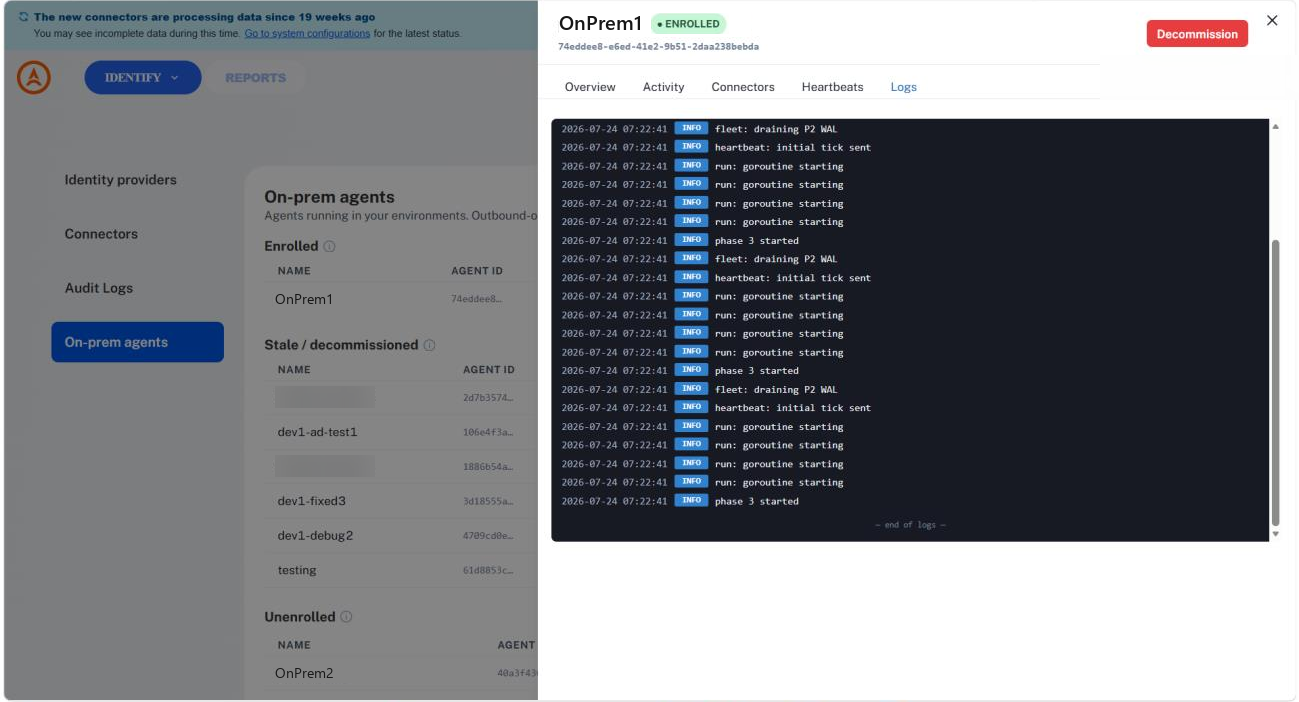
- Activity, Heartbeats, Logs — its recent history and check-ins.
The Logs tab is the quickest way to see what an agent is doing without asking your
operator for docker logs.
Audit trail
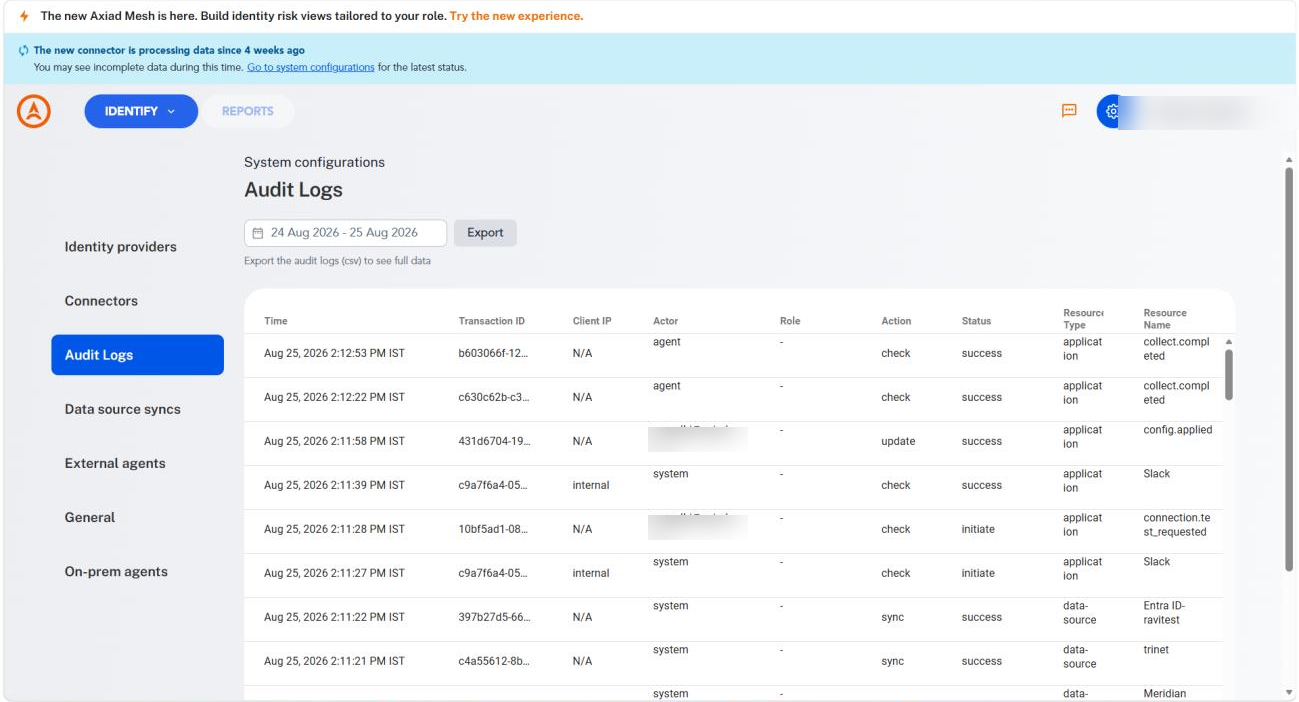
Everything your agents and their connectors do is recorded alongside the rest of your tenant's activity. Go to System configurations > Audit Logs to review it — agents registering and decommissioning, connector configuration changes, connection tests, and each collection run.
Each entry shows the time, a transaction ID, the client IP, the actor (one of your users, the agent itself, or the system), the action, its status, and the resource affected. Filter by date range, and select Export to download the full records as CSV.
Decommission an agent
To permanently retire an agent, open it and select Decommission. You'll be asked to type the agent's name to confirm. Use it when a host is retired or you suspect it's compromised.
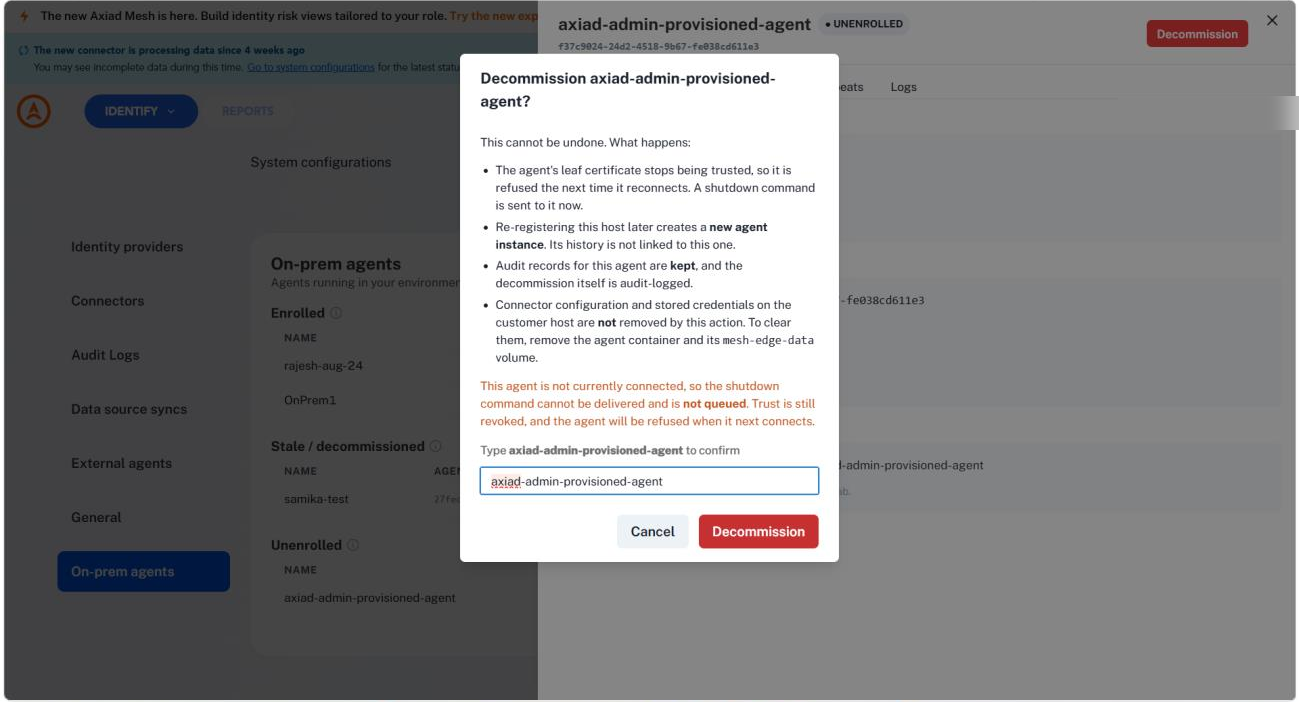
Decommissioning cannot be undone. What happens:
- The agent's leaf certificate stops being trusted, so it's refused the next time it connects. If it's currently connected, a shutdown command is sent to it now.
- Registering this host again later creates a new agent instance — its history isn't linked to this one.
- Audit records for the agent are kept, and the decommission itself is audit-logged.
- Connector configuration and stored credentials on the customer host are not removed
by this action. To clear them, your operator removes the agent container and its
mesh-edge-datavolume — see Run the edge agent.
If the agent isn't connected at the time, the shutdown command can't be delivered and is not queued. Trust is still revoked, so the agent is refused when it next connects.
Verify
- The agent shows Enrolled.
- Your connector shows Running, or its test ingestion succeeded on every endpoint.
- Data from your internal system appears in Mesh on its next collection.
Next step
Hand off to your operator if you haven't already: Run the edge agent. Or add more connectors to the same agent — one agent can serve several internal systems.